


15
Set Time
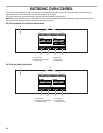
1. From the Setup Menu, touch SET TIME.
2. Enter the time using the on-screen number keyboard. A valid
time must be entered in order to save the settings.
3. If Clear is pressed, the clock clears to 00:00.
4. Choose AM or PM.
5. Touch SAVE. This will return you to the Clock Screen.
Date
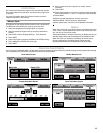
1. From the Setup Menu, touch SET DATE.
2. Enter the day using the on-screen number keyboard.
3. Choose the month using the “<“ or “>” buttons.
4. Choose the year using the “<“ or “>” buttons.
5. Touch SAVE. This will return you to the Clock Screen.
Clock Options
1. From the Setup Menu, touch CLOCK OPTIONS.
2. Select desired clock units: AM/PM or 24-HOUR (military).
3. Select ANALOG or DIGITAL for clock style.
4. Touch Save. This will return you to the Clock Screen.
Sound Volume
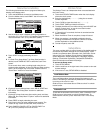
1. From the Setup Menu, touch SOUND VOLUME.
2. Adjust the timer, button press, or alert sounds; use the slider
bar to enter desired sound levels.
3. Touch ON/OFF to toggle between settings for start-up and
shutdown sounds. When “On,” the oven will make a sound
when it transitions in and out of idle mode. When “Off,” no
sounds will be made.
4. If the Cancel button is touched, the sounds settings will go to
the recommended level.
5. Touch SAVE. This will return you to the Clock Screen.
Screen Appearance
1. From the Setup Menu, touch SCREEN APPEARANCE.
2. Select a screen appearance to match your oven.
3. Touch SAVE. This will return you to the Clock screen. The
following message will show: “You have selected a new
theme. The oven will reset momentarily. Please wait.” It will
take approximately 1 minute to restart the oven with the new
settings.
Screen Brightness
1. From the Setup Menu, touch SCREEN BRIGHTNESS.
2. Use the slider bar to adjust the screen brightness.
3. Choose “Dim The Screen” or “Turn-Off The Screen” for use
when the oven has been idle for 5 minutes.
4. If the Cancel button is touched, the screen brightness will go
to the recommended level and return you to the clock display
screen.
5. Touch SAVE. This will return you to the Clock Screen.
Language
1. From the Setup Menu, touch LANGUAGE.
2. From the Language Menu, select your language: English or
Français.
3. If Cancel button is touched, the language will go back to the
default setting.
4. Touch SAVE. This will return you to the Clock Screen.
Regional Settings
1. From the Setup Menu, touch REGIONAL SETTINGS.
2. Select a temperature unit: Fahrenheit or Celsius. Toggle
between °F/°C.
3. Select YES or NO to observe Daylight Saving Time.
4. Touch SAVE. This will return you to the Clock Screen.
Self-Clean
This setting is disabled while oven is in use. See the
“CustomClean™ Self-Cleaning with Adjustable Levels and Auto
Lock” section.
Sabbath Mode
The Sabbath Mode sets the oven to remain on in a bake setting
until turned off. A timed Sabbath Mode can also be set to keep
the oven on for only part of the Sabbath. When the Sabbath
Mode is set, only the number and start keys will function. No
tones will sound, and the display will not show messages or
temperatures changes. The heat source icons will appear lit on
the oven display throughout the Sabbath Mode.
When the oven door is opened or closed, the oven light will not
turn on or off and the burners will not turn on or off immediately.
If a power failure occurs when the Sabbath Mode is set, the oven
will remain in Sabbath Mode but will no longer be actively
cooking. When power returns, the display will read “SABBATH
MODE - Power outage has occurred.” Touch CANCEL to return
to the normal operating mode (non-Sabbath Mode, not cooking).
NOTE: If you touch Sabbath Mode while the temperature probe
is set, a message will appear saying “Probe not inserted.”
Remove the probe and touch NEXT to enter the Sabbath Mode.
Touch CANCEL to return to the Bake mode.
WARNING
Burn Hazard
Use an oven mitt to remove temperature probe.
Do not touch broil element.
Failure to follow these instructions can result in burns.