


16
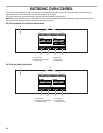
To Use Sabbath Mode:
The Sabbath Mode must be enabled each time it is used.
1. From the Setup Menu, scroll the bar until Sabbath Mode
appears and touch SABBATH MODE.
2. From the Sabbath Mode Menu, read the on-screen
instructions and touch OFF to turn Sabbath Mode on.
NOTE: Sabbath Mode disables the 12-hour shutoff. All lights
and displays are disabled so that no visible activity takes
place when the oven door is opened.
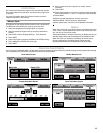
3. On 48" [121.9 cm] ranges, select the oven to set up by
pressing the Left Oven or Right Oven buttons.
4. Touch COOKING SETTING. To select the oven temperature,
use the slider to enter a desired temperature or touch the
-5°F (-1°C) or +5°F (+1°C) buttons to decrease or increase the
temperature. The temperature must be between 170°F (77°C)
and 550°F (288°C) or an invalid key alert occurs and the
default temperature appears on the screen.
5. Press NEXT.
6. If desired, set the Cook Timer by using the on-screen number
keyboard. The time length may not exceed 12:00:00. When
the timer ends, the oven cavity will stop heating.
7. Press NEXT.
8. On 48" [121.9 cm] ranges, repeat steps 1-8 to set the second
oven, if desired.
9. (Optional) To set a Delayed Start, touch DELAY START and
set the desired time. See the “Delay Start” section for more
information.
10. Press START to begin heating the oven.
11. Press CANCEL OVEN (CANCEL LEFT or CANCEL RIGHT on
48" [121.9 cm] models) to turn off the oven.
To Disable Sabbath Mode:
Sabbath Mode will automatically be disabled when a cook time
ends, or can be disabled by pressing Cancel. “Sabbath Mode:
OFF” will appear on screen. To program a new cycle, follow steps
2 - 11 in the “To Use Sabbath Mode” section.
To Change Temperature:
The oven temperature can be changed when the oven(s) are in
the Sabbath Mode. No tones will sound, and the display will not
change. Touch the -25°F (-14°C) or +25°F (+14°C) buttons once
for each 25°F (14°C) temperature change desired.
NOTE: On double ovens, if both ovens are operating in Sabbath
Mode, the temperature of each oven can be changed
independently. Touch the -25°F (-14°C) or +25°F (+14°C) buttons
for the desired oven.
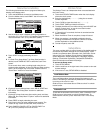
Temperature Calibration
1. From the Setup Menu, touch TEMPERATURE CALIBRATION.
2. On 48" (121.9 cm) ranges, select which oven to calibrate by
pressing LEFT OVEN or RIGHT OVEN.
3. Touch NEXT.
4. Select the temperature offset. Press -1° button if oven seems
too hot or +1° button if oven seems too cold. The oven can
be adjusted +/- 35°F.
5. Touch SAVE and the adjustment has been made.
Touchscreen Calibration
IMPORTANT: If the buttons on the screen are difficult to touch
accurately, you may need to calibrate the touchscreen.
1. From the Setup Menu, touch TOUCHSCREEN
CALIBRATION.
2. Touch NEXT.
3. You will be asked to touch, hold and release 3 targets to
calibrate.
4. You will be asked to again touch the same targets in
10 seconds. If calibration failed, it will restart the process at
Step 2.
5. Test calibration by moving the circle around the screen.
Ensure you can reach all the corners.
6. Touch TRY AGAIN to run calibration again.
7. If CANCEL is touched, the Touchscreen Calibration will be
canceled.
8. Touch SAVE. This will return you to the Clock Screen.
Reset All Settings To Factory Defaults
1. From the Setup Menu, touch RESET ALL SETTINGS.
2. Touch RESET or CANCEL.
3. If Reset is touched, the following settings will be lost: most
used modes, My Creations, Date/Time, and Language. The
Welcome Guide will appear to help you reset these settings.
Service Information
For more information, see the “Assistance or Service” section.
1. From the Setup menu, touch SERVICE INFORMATION.
2. Choose ON or OFF for Demo Mode.
3. If CANCEL is touched, the Service Information will go back to
the default setting.
4. Touch SAVE. This will return you to the Clock Screen.
WARNING
Food Poisoning Hazard
Do not let food sit in oven more than one hour before
or after cooking.
Doing so can result in food poisoning or sickness.