


13
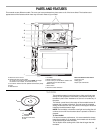
■ Always use the turntable.
■ To avoid damage to the microwave oven, do not allow
contact with another metal object during microwave cooking.
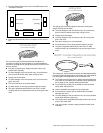
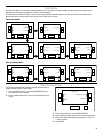
Do Not Use
Metal cookware and bakeware, gold, silver, pewter, non-
approved meat thermometers, skewers, twist ties, foil liners
such as sandwich wrappers, staples and objects with gold or
silver trim or a metallic glaze should not be used in the
microwave oven.
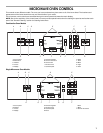
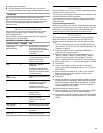
Microwave Cooking Power
Many recipes for microwave cooking specify which cooking
power to use by percent, name or number. For example,
70%=7=Medium-High.
Use the following chart as a general guide for the suggested
cooking power of specific foods.
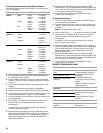
MICROWAVE COOKING POWER CHART
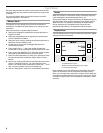
Cook Sensor
During the Sensor Cook function, a sensor automatically adjusts
for the cook time and power level.
The microwave oven display will show the time countdown once
the sensor identifies the cooking duration.
If the microwave oven door is opened during a sensor function,
the microwave oven will turn off and any additional operations
will be canceled.
For best cooking performance:
Before using a sensor cook function, make sure power has been
supplied to the microwave oven for at least 2 minutes, the room
temperature is not above 95°F (35°C), and the outside of the
cooking container and the microwave oven cavity are dry.
My Creations
My Creations allows the customization of cooking processes.
When My Creations is selected from the main menu a list of
existing creations is presented along with the ability to create
more.
1. From the Select Mode menu, touch the MORE button until
“My Creations” is shown. Touch the quickset pad next to “My
Creations” to select it.
2. Touch the quicket pad next to ADD NEW CREATION to
customize your cooking process.
3. Select the desired cook mode. Choose between “Cook,”
“Defrost,” “Reheat,” “Steam,” “Boil & Simmer,” “Melt,” or
“Soften.” On some models, “Convect Bake,” “Convect
Roast,” “Browning Pan” and “Broil & Grill” are also available.
4. Enter a Cook Time (--:--:--). The maximum length is 01:30:00.
5. Touch NEXT.
6. If the “Convect Bake” mode (on convection models) is
chosen, enter a cook temperature between 170° (77°C) and
450°F (232°C).
7. Select a power level between 10 - 100%. In the “Convect
Bake” mode (on convection models), the Power Level
selection is unavailable.
8. Touch NEXT.
9. Review your settings. If any extra stage is needed, touch the
quicket pad next to “Add Stage.” Each stage set shows the
following information: Mode, Power/Temperature, and Cook
Time. It is possible to have 3 stages. Enter the information
into each stage then touch SAVE.
10. Select a name for the new creation.
11. Review the settings. Touch the quickset pad next to “Delete
Now” to delete the item or “No” to save the settings.
12. You will return to the “My Creations” menu. Select the desired
creation by touching the quickset pad next to it. Then Press
START.
PERCENT/NAME NUMBER USE
100%, High
(default setting)
10 Quick heating convenience
foods and foods with high
water content, such as soups,
beverages and most
vegetables.
90% 9 Cooking small, tender pieces
of meat, ground meat, poultry
pieces and fish fillets.
Heating cream soups.
80% 8 Heating rice, pasta or
casseroles.
Cooking and heating foods
that need a cook power lower
than high. For example, whole
fish and meat loaf.
70%,
Medium-High
7 Reheating a single serving of
food.
60% 6 Cooking sensitive foods such
as cheese and egg dishes,
pudding and custards.
Cooking non-stirrable
casseroles, such as lasagna.
50%, Medium 5 Cooking ham, whole poultry
and pot roasts.
Simmering stews.
40% 4 Melting chocolate.
Heating bread, rolls and
pastries.
30%, Medium-
Low, Defrost
3 Defrosting bread, fish, meats,
poultry and precooked foods.
20% 2 Softening butter, cheese, and
ice cream.
10%, Low 1 Taking chill out of fruit.