


14
Table Inserts
Always unplug the saw to avoid
accidental starting. Failure to comply may
cause serious injury!
!
Remove table insert to remove all small pieces
of debris from the table cavity before
performing any cuts.
!
Be sure to reattach the table insert prior to
performing a cutting operation.
Do not start the saw without
checking for interference between the blade
and table insert.
Damage could result to the blade, table insert or
turntable if blade strike occurs during the cutting
operation.
To remove:
1. Loosen and remove six screws on the table
inserts (see page 10) with a crosspoint
screwdriver
2. Remove the inserts.
To install:
3. Reposition the table inserts.
4. Install the six screws and tighten.
Check for blade clearance by moving the slide
carriage through the full motion of the blade in the
table slot.
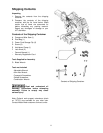
Mounting the Saw
Observe the following safety measures to avoid
injury form unexpected saw movement:
• Disconnect the power cord and lock the cutting
head in the lower position.
• Lock the slide carriage in place.
When lifting:
• Use the carrying handles on the top of the saw.
• Bend at the knees, not from the back.
• Clamp or bolt the saw on a level work surface.
For stationary use:
Select a location for the saw, such as the top of a
workbench, making sure to provide sufficient room for
handling the workpiece. Secure the saw to the bench.
Mounting hardware is not included and must be
purchased separately.
For portable use:
Place the saw on a 3/4 in. thick piece of plywood
and bolt the base securely to the plywood using the
mounting holes on the base. Mounting hardware is
not included and must be purchased separately.
Use C-clamps to clamp this mounting board to a
stable work surface at the worksite.
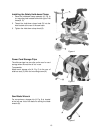
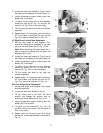
Removing the Blade
Disconnect power and make
sure the switch is in the OFF position to avoid
accidental starts. Failure to comply may cause
serious injury!
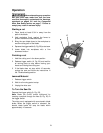
Referring to Figure 7:
1. Unplug the saw from the outlet.
2. Raise the miter saw to the upright position.
3. Raise the lower clear plastic blade guard (A) to
the uppermost position.
4. While holding the lower blade guard, loosen the
cover plate screw (C) with a crosspoint
screwdriver.
5. Rotate the cover plate (B) to expose the arbor
bolt (H).
6. Place the blade wrench over the arbor bolt (H).
7. Locate the arbor lock (E) on the motor, below
the belt cover (D).
8. Press the arbor lock, holding it in firmly while
turning the blade clockwise. The arbor lock will
then engage and lock the arbor. Continue to
hold the arbor lock, while turning the wrench
clockwise to loosen the arbor bolt.
9. Remove the arbor bolt (H), arbor collar (G), and
blade (J). Do not remove the inner blade collar.
10. Raise the lower clear plastic blade guard (A) to
the upright position to remove the blade.
Note: Pay attention to the pieces removed, noting
their position and direction they face. Wipe the
blade collars clean of any sawdust before installing
a new blade. Also, the 12 in. blade has a 1 in. arbor
hole with a 5/8 in. reducer (F) to mount onto the
saw.