


7. ADJUSTING THE GRINDER
The Grinder Fineness Adjustment Ring is set to a medium grind
position. We recommend leaving the grinder in this position for
most applications.
Please note: You can only adjust the grinder during grinding.
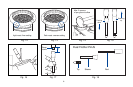
• If you have extremely dark roasted, oily beans, set the grinder to
a coarser setting. Turn the ring counter-clockwise toward the
1-dot position (Fig. 13).
• For light roasted beans turn the ring towards the 3-dot position
(Fig. 12).
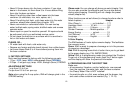
7a. COFFEE STRENGTH (FLAVOR)
The grinder can be set to grind between 5 and 16 grams of
coffee. The grinding times are approx. as follows:
MILD .......... 5 seconds.
NORMAL ... 7.5 seconds.
STRONG..... 9 seconds.
The overall strength of your coffee depends on the amount of
ground coffee, the cup size and the kind of bean you are using.
ENA can produce from a short, very strong cup (0.5 oz STRONG)
to a very mild 8 oz. cup of coffee (8 oz. MILD).
8. DAILY PREPARATION
We recommend filling the water container every morning with
fresh, cold water. This will enhance the taste of your coffee.
• Push the On/Off button on top of the machine until display
shows
HEATING.
• Place a cup under the coffee spouts. When the display shows
PRESS ROTARY, push the Rotary Dial. RINSING. The
rinse cycle stops by itself and the display shows
READY.
You are now ready to make coffee.
Please note: When turning the ENA off after brewing coffee, it will
run an automatic rinse cycle.
9. GRINDING AND BREWING COFFEE BEVERAGES
The coffee brewing sequence is grind, tamp, pre-brew, brew and
discard. The ENA uses a 2-step brewing process (Pre-Brew
Aroma System). First, a bit of hot water pushes into the ground
coffee and moistens it (pre-brew phase), pauses for a few sec-
onds, and then starts the high-pressure-brewing process. Adjust
the height of the coffee spout to your cup size and place one or
two cups underneath the coffee spouts. The closer the spout is
to your cups, the more crema you will have in your cups.
Important: Once the high-pressure brewing starts you can
always stop the brewing by simply pressing the Rotary Dial. You
cannot stop the grinding or pre-brew cycle.
Important: Never try to pull out the tray while the machine is
grinding, brewing, or discarding the used coffee. Always wait
until the display shows
READY.
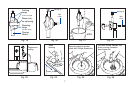
9a. PREWARM CUPS
Pre-warm cups with hot water through the frother. If your cups
are cold, they will take away 5 to 10 degrees from your coffee
temperature, especially if you make short coffee beverages
(Ristretto, Espresso). Place your cups under the frother, and turn
the Steam Water Selector Switch to the Hot Water / Steam
position (Fig. 5).
WATER. Let a bit of hot water prewarm your
cup. Turn the hot water switch back to the cup position and
discard the water.
READY.
14.