


7
Ⅲ Never use a faulty machine or one with a damaged power cable.
Ⅲ Never immerse the machine in water.
2.2 Safety precautions
Ⅲ Never expose the machine to the effects of rain, snow or frost
and never operate it with wet hands.
Ⅲ Place your espresso/coffee machine on a solid level surface.
Never leave it on a surface that is warm or hot (hob etc.).
Choose a location that is inaccessible for children or pets.
Ⅲ Remove plug from power socket if an absence for a longer
period of time (holidays etc.) is planned.
Ⅲ Always remove plug from power socket before cleaning.
Ⅲ When removing plug from power socket, never tug on the cord
or on the machine itself.
Ⅲ Never repair or open the machine yourself. All repairs should be
performed only by authorised service centres using original Jura
spare parts and accessories.
Ⅲ The machine is connected to the mains power socket via an
electric cable. Ensure that no one trips over this cable and
pulls down the machine. Keep children and animals away.
Ⅲ Never put the machine or even parts of it in the dishwasher.
Ⅲ To prevent overheating put the machine in an airy place.
Ⅲ If you are using an acid-based descaling agent, it is important to
avoid any splashed or drips on sensitive kitchen surfaces, parti-
cularly those in natural stone or wood. If they do occur, they
should be removed immediately.
3. Check before use
3.1 Checking mains voltage
The machine is set for the correct voltage before leaving our fac-
tory. Ensure that your mains voltage corresponds to the details quo-
ted on the rating plate attached to the bottom of the machine.
3.2 Checking fuse
The machine is designed for a current of 10 amps. Check that an
appropriate fuse is fitted.
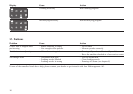
3.3 Filling water tank
Ⅲ Remove water tank and rinse well with cold clean tap water.
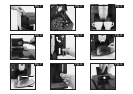
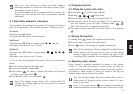
Ⅲ Fill the tank and replace it in the machine. Ensure that the tank
clicks correctly into place (Fig. 1).
Note: Use only clean cold water. Never fill the tank with
milk, mineral water or any other liquid. You can also top the
tank up with water without removing it from the machine.
Simply pull up cover and pour water into the tank from
above. Put cover back in its original position.
3.4 Adding coffee beans
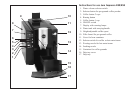
Ⅲ Lift up cover of the bean container (11).
Ⅲ Clean out any dirt or alien elements from the bean container.
Ⅲ Fill the grinder container with coffee beans and close the cover.
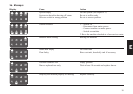
3.5 Adjusting grinder
You can adjust the grinder to the roast of your coffee. We recom-
mend the following:
for a light roasting ➞ a finer adjustment
for a dark roasting ➞ a coarser adjustment
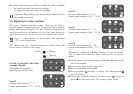
Ⅲ Open the cover of the bean container (11).
Ⅲ To adjust grinding turn selector switch (Fig. 2) to the wanted
position.
E