


8
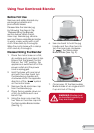
8. Remove the silicone seal from
the Removable Blade Holder
(See. Fig. 3).
Fig. 3
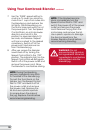
NOTE: The blending blades
are extremely sharp. Avoid any
contact with fingers and hands.
Assembling and Attaching
the Blender Jug
1. Place the motor base on a flat,
dry surface such as bench top.
Ensure the Speed Control Dial is in
the ‘OFF’ position, the appliance
is switched off at the power outlet
and the power cord is unplugged.
2. Ensure the lid is off the blender jug
and place the blender jug upside
down on a flat, dry surface such
as a bench top.
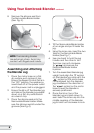
3. Place the silicone seal onto the
Removable Blade Holder. Make
sure the silicone seal sits under the
grooves (See Fig. 4).
Using Your Kambrook Blender continued
Fig. 4
4. Tilt the Removable Blade Holder
at an angle and put it inside the
jug.
5. Using the inner cap, insert the two
tabs on the Removable Blade
Holder (See Fig. 1).
6. Use one hand to hold the jug
handle and the other to turn
the inner cap anti-clockwise
to ‘
’ and secure the
Removable Blade Holder
in place.
7. Turn the assembled blender jug
upright and align the ‘
’ symbol
on the blender jug collar with the
‘
’ symbol on the motor base.
Once aligned turn the blender
jug clockwise in the direction of
the ‘
’ symbol on the motor
base. Ensure the blender is
securely positioned.
8. Place the lid on top of the
blender jug and push down to
seal. Insert the inner cap into the
middle opening of the blender
jug lid and turn clockwise to lock.