


7
3. Drain water from Pasta System.
4. Fill Pasta System vessel with water. See page 7 –
Filling.
UNDER NO CIRCUMSTANCES SHOULD THE PASTA
SYSTEM BE LEFT UNATTENDED DURING
BOIL-OUT. TRAINED PERSONNEL MUST BE
PRESENT DURING THE PROCEDURE TO PREVENT
BOIL OVER OR TO TURN OFF THE POWER IF
WATER DROPS BELOW HEAT TRANSFER TUBES.
5. Turn Pasta System on and bring water and a gentle
boil.
6. Once boil has been reached, turn Pasta System off.
7. Dissolve 3 cups of vinegar for every five gallons of
warm water and let soak for one hour. If there is a
large build-up of scale, allow Pasta System to soak
overnight.
8. While soaking, a natural fiber brush may be used to
scrub the tubes and inside walls of Pasta System
vessel.
9. Drain the water and vinegar.
10. Spread Keating Klenzer liberally on elements and
sides of Pasta System vessel.
11. At this point, a non-abrasive scouring pad may be
used to remove any leftover scale.
12. Thoroughly rinse Pasta System vessel with potable
water to remove all Klenzer.
13. Prior to refilling with water, wipe the inside of the
Pasta System vessel making sure all water and
Klenzer has been removed.
14. Close drain valve.
15. Refill the Pasta System with fresh water. See page
7 – Filling.
HOW TO PROGRAM THE “KEATING”
ELECTRONIC TIMER – PART #023709
STEP 1 Make certain power to the timer has been
OFF for at least 30 seconds. Then PRESS
and hold down the UP arrow button while
turning the rocker power switch to the ON
position.
NOTE: If power switch does not turn off timers, the
unit must be unplugged (two people may be needed).
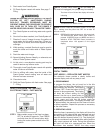
The timer will turn ON and the display will now be
indicating
OR
The BEEPER will BEEP 4 times.
NOTE: If STEP 1 was OK, proceed to STEP 2. If not, retry
Step 1 making sure the power was OFF for at least 30
seconds or more.
STEP 2 PRESS all 3 buttons in sequence: left-center-right.
The BEEPER will BEEP when each button is
pressed. If BEEPER does not BEEP, the timer is
defective. STOP TESTING. Reset procedure is
completed when 1:00 appears on the digital
display.
TIMER OPERATING INSTRUCTIONS
DIGITAL TIMERS
PART #056921 – REPLACES PART #023709
The electronic timers provide a clearly visible and
accurate display and are very easy to use.
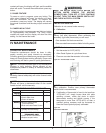
A. PROGRAMMING
To program the timers, the unit must be in the idle
mode. Press and hold the set button for
approximately two seconds. The display
will show “SEt”. Press the button for the
channel to be programmed. The display
will show the current setting for that
channel. Use the up or down button to
increment or decrement the setting. When the setting is
correct, press and hold the set button again for
approximately two seconds. The display will show "StO"
for approximately two seconds and the timer will return
to normal operation. Repeat the process as necessary
for the other timers.
B. OPERATING LOGIC
When the timer is powered up, the display will show the
time setting for the channel that was operated last and
the relay output contacts will be open. To start a cycle,
press the desired channel button (1-3). The display will
begin to countdown from the preset time setting and the
relay output contacts will close. During the countdown
the colon will flash at a one-second rate. When the
countdown has reached "00:00" the relay output
– – –
– – –
•
•
1:00
1:00