


Select Clean
When Select Clean begins the cleaning cycle, the
motorized door latch mechanism wiii automatically start to
lock the oven door and the DOOR LOCKED indicator light
will flash. DO NOT open the oven door when the DOOR
LOCKED indicator light is flashing. Allow about 15 seconds
for the oven door to completely loci<.
Once the oven door has locked the DOOR LOCKED
indicator light will glow steady. When CLn will appears in
the display Select Clean is active.
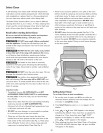
Use caution when opening the oven door
after self-cleaning. The oven may still be VERY HOT and
can cause burns. To avoid possible burns stand to the side
of the oven when opening the oven door to allow hot air or
steam to escape.
When Select Clean is finished:
1. The time of day will appear in the display window and
the Select Clean and DOOR LOCKED indicator lights
will continue to glow.
2. Once the oven has cooled down (about 1 hour) and the
DOOR LOCKED indicator light has turned off the oven
door may be opened.
3. When the oven interior has completely cooled° wipe
away any residue or powdered ash with a damp cloth
or paper towel.
Important notes:
° The kitchen area should be well ventilated using an open
window, ventilation fan or exhaust hood during the 1st
self-clean cycle. This will help eliminate the normal odors
associated with the 1st self-clean cycle.
DO NOT attempt to open the oven door when the
DOOR LOCKED indicator light is flashing. Allow about
15 seconds for the motorized door latch mechanism to
completely lock or unlock the oven door.
When the clean time finishes the oven door will remain
locked until the range has cooled sufficiently. In addition
to the clean time that was programmed, you must allow
about 1 additional hour for the oven to cool before you
will be able to open the oven door.
° The Select Clean function will not operate whenever a
radiant surface element is ON or the oven lockout is
active.
Delayed Start Select Clean
To
1.
.
3.
4.
.
6.
.
set Delay Start Select Clean:
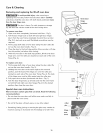
Be sure the oven is empty and ALL oven racks are
removed. Remove all items from the cooktop. Be sure
oven door is completely dosed.
Be sure the clock shows the correct time of day.
Press Delay Start key pad.
Press and hold the A key pad to scroll to the time to
start the self-clean cycle. Release the key pad when the
desired start time is displayed.
Press Select Clean key pad.
display.
appears in the
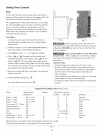
Press A or V once. 3:00 appears in the display
indicating the default 3 hour clean time is selected. To
select a 2 hour clean time press V; 2:00 appears in
the display. To select a 4 hour clean time press A ;
4:00 appears in the display.
After selecting the clean time Select Clean is set to
activate. The DOOR LOCKED indicator light will turn
on and the oven door will Jack in advance of the starting
time. Once the starting time is reached CLn wiii appear
in the display.
If it becomes necessary to stop Select Clean when active:
[]
1. Press STOP.
2. If Select Clean has heated the oven to a high
temperature, allow enough time for the oven to cool
and for the DOOR LOCKED indicator light to turn off.
When this indicator light turns OFF the oven door may
be opened.
3. Restart Select Clean if needed.
Important notes:
° If Select Clean is active and a power failure occurs, the
oven may not have thoroughly cleaned. This would
depend on how much cleaning time had elapsed before
the power failure. If needed after power is restored, set
Select Clean again.
21