


Care & Cleaning
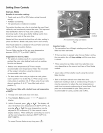
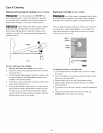
Raising and lowering the cooktop (some models)
To avoid possible burns DO NOT turn
the surface elements on when the cooktop is raised. Be
sure that the top is completely lowered and securely in
place before turning on any of the surface burners.
When lowering the lift-up range cooktop,
grasp the sides with fingertips only. Be careful not to
pinch fingers. Do not drop or bend the cooktop when
raising or lowering. This may permanently damage the
cooktop surface.
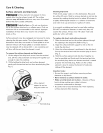
cooktop
\
ip rods
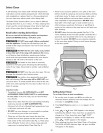
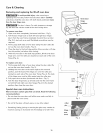
Replacing oven light (some models)
Be sure the range is unplugged and aii parts
are COOL before replacing oven light. Wear a leather-
faced glove for protection against possible broken glass.
The oven light is located at the rear of the oven cavity and
is covered with a glass shield held by a wire holder. The
glass shield protects the light bulb and must be in place
whenever the oven is in use.
wire
holder
Fig. 1
To raise and lower the cooktop:
1. Remove all items from cooktop and set aside.
2. Grasp the sides of the cooktop and then lift from the
front (See Fig. 1).
3. Lift the cookop high enough to allow the support rods
to snap into place. The llft-up rods will support the
cooktop in the raised position.
4. If necessary, clean underneath using hot, soapy water
and a clean cloth; then dry.
5. To lower the cooktop, grasp the front corner of each
side of the top while pushing back on each rod with
the heel of your hand. This will release the notched
support. Hold the range cooktop and gently slide the
top back down level to the range.
To replace the inferior oven light bulb:
1. Turn electrical power off at the main source or unplug
the range.
2. Press wire holder to one side to release the glass shield
that covers the light bulb.
3. Replace light with a new 40 watt appliance bulb.
4. Replace glass shield over bulb and snap wire holder
back into place.
5. Turn power on at the main source (or plug the appliance
in).
6. The clock will then need to be reset. To reset, see
Setting clock in this Use & Care Guide.
25