- CARE OF YOUR REVERSE OSMOSIS SYSTEM -
To keep your reverse osmosis system operating and
producing higil quality" water, you must make sure
supply water is Nways within the lhnits shown in the
specifications. Good supply water helps to assure
longer Fifefrom the RO membrane cartridge, prefilter
and postfilter cartridges. However, each of these will
wear out in time and need replacement.
This reverse osmosis system contai_ a replaceable
treatment component critical for effective removal of
total dissolved solids. The monitor faucet featttre
provides continuous analysis of fhe systems perfof
nmnce. For systems not eqtripped with the monitor
faucet function, it is highly recommended that you
have your water tested at least every 6 months to
verify your system is performing properly. Test kits are
available by calling 1-800-826-8553 exL 47, or check
ghe water testing section of yottr local phone directory
If the RO assembly is wall mounted, you may be able
to replace parts with the assembly left on the wN1. If
not, simply lift the RO assembly from the momlting
washers and lay on the cabhlet floor when replacing
the prefilter and post filter cartridges and RO mem-
brane.
Note: To prevent spillage, place a contmner under
the RO assembly, or put the RO assembly in a con-
tmner to catch the water.
CAUTION: Before disconnecting parts, be sure to
close the water supply valve to the RO.
PREFILTER AND POST FILTER
CARTRIDGES
You must replace the prefilter cartridge often to Fo-
rcer the RO membrane front being destroyed by chlorine,
and / or from plugging with sediments hi your water
supply. If the water supply contmns both chlorine
and sediments, replace the prefilter cartridge at least
every 6 months of product water use. Replace more
often than 6 months if it begins to pkug with sedi-
ments.
If the water has sediments onl$; with no chlor*me, you
may notice a slower making of product water as the
prefilter collects the sediments. When this occurs, re-
place the prefilter cartridge. Also _Iace the post fiIter
cartridge.
To replace the filter cartridges (see FIG. 9):
1. Turn offthe water supply and open the RO faucet
to relieve pressure.
2. Remove (turn to the left) both sumps from the filter
heads. Be careful...the sumps are full of water.
3. Remove and discard the inner cartridges in a prop-
er manner. Flush the insides of the stunps with fresh
water. Do not lose the large o-ring seals.
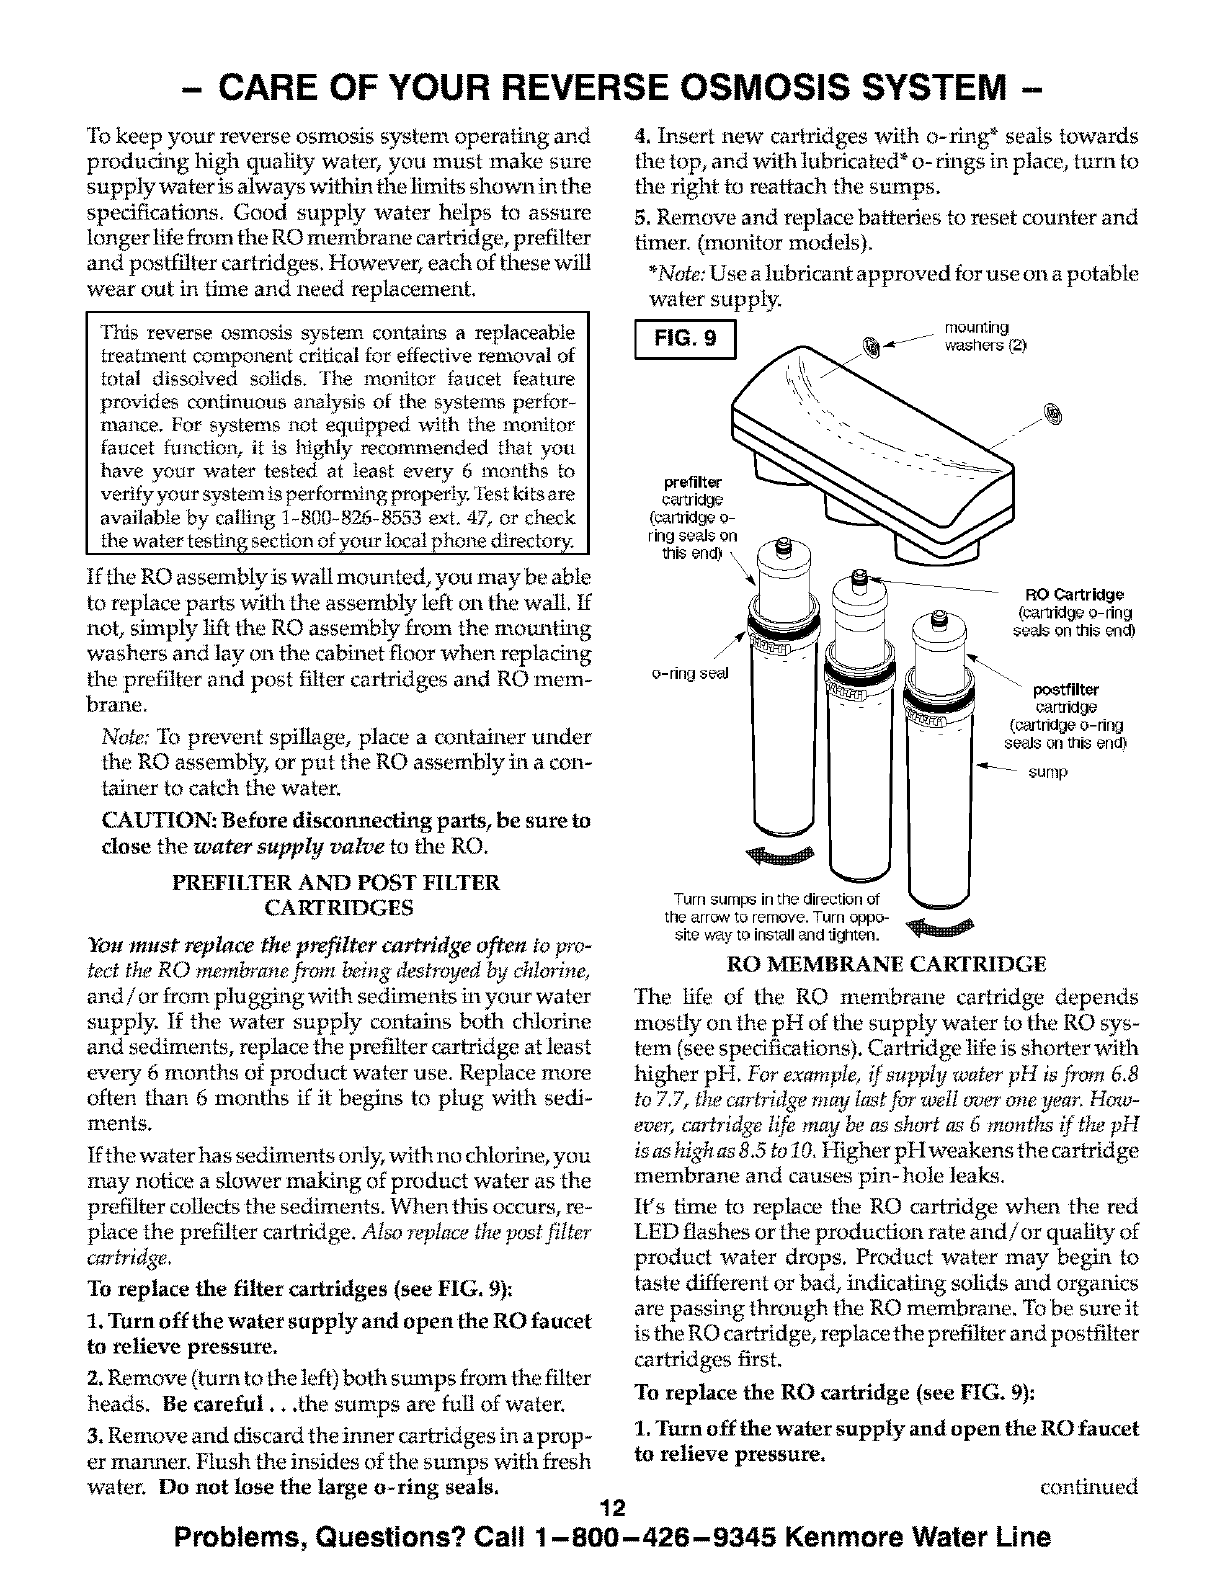
4. Insert new cartridges with o-ring* seals towards
the top, and with lubricated* o- rings in place, turn to
the right to reattach the sumps.
5. Remove and replace batteries to reset counter and
timer. (monitor models).
*Note: Use alubricant approved for use on a potable
water supply.
mounting
FIG. 9 _ washers(2)
12
prefilter
cartridge
(cartridgee-
ring seals on
this end) \
e-ring sen
Re gartrid9e
(cartridge o-ring
seals on this end)
I_etfilter
_1 _artridge
(cartridge o-ring
seals on this end)
SUnlp
Turn sumps in the direction of
the arrow to remove. Turn 013130-
site way to instNI e_d tighten.
RO MEMBRANE CARTRIDGE
The life of the RO membrane cartridge depends
mostly on the pH of the supply water to the RO sys-
tem (see specifications). Cartridge Fife is shorter with
higher pH. For ex_mple, if supply water pH is from 6.8
to 7.7, the cartridge may Iast for well c_er one yean How-
eveg cm'tridge Iifi'_may be as short as 6 months if the pH
is as high as 8.5 to ! 0. Higher pH weakens the cartridge
membrane and causes pin-hole leaks.
It's time to replace the RO cartridge when the red
LED flashes or the production rate and/or quality" of
product water drops. Product water may begin to
taste different or bad, indicatiug solids mid organics
are passing through the RO membrane. To be sure it
is the RO cartridge, replace the prefilter and postfilter
cartridges first.
To replace the RO cartridge (see FIG. 9):
1. Turn offthe water supply and open the RO faucet
to relieve pressure.
continued
Problems, Questions? Call 1-800-426-9345 Kenmore Water Line


