


4
to use your food processor
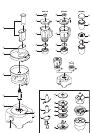
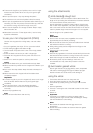
1 Fit the detachable shaft onto the power unit ᕡ.
2 Then fit the bowl. Place the handle towards the back and turn
clockwise until it locks ᕢ.
3 Fit an attachment over the drive shaft.
●
Always fit the bowl and attachment onto the machine before
adding ingredients.
4 Fit the lid ᕣ - ensuring the top of the drive shaft locates into the
centre of the lid.
●
Do not use the lid to operate the processor, always
use the on/off control.
5 Plug in and the power on light will come on. Switch on and select
a speed.
●
The processor won’t work if the bowl and lid are fitted
incorrectly.
●
Use the pulse (P) for short bursts. The pulse will operate for as
long as the control is held in position.
6 Reverse the above procedure to remove the lid, attachments and
bowl.
●
Always switch off before removing the lid.
important
●
Your processor is not suitable for crushing or grinding coffee
beans, or converting granulated sugar to caster sugar.
●
When adding almond essence or flavouring to mixtures avoid
contact with the plastic as this may result in permanent marking.
to use your liquidiser (FP910)
1 Fit the sealing ring ቯ into the blade unit ተ - ensuring the seal is
located correctly. Leaking will occur if the seal is
damaged or not fitted correctly.
2 Screw the jug onto the blade unit.
3 Put your ingredients into the jug.
4 Put the filler cap in the lid, then turn.
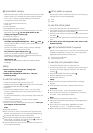
5 Turn the lid in a clockwise direction ᕤ to lock onto the jug.
6 Place the liquidiser onto the power unit and turn to lock ᕦ.
7 Select a speed or use the pulse control.
to use your liquidiser (FP920)
1 Fit the sealing ring ቯ into the blade unit ተ - ensuring the seal is
located correctly. Leaking will occur if the seal is
damaged or not fitted correctly.
2 Screw the jug onto the blade unit.
3 Put your ingredients into the jug.
4 Fit the lid to the goblet and push down to secure ᕥ. Fit the filler
cap.
5 Place the liquidiser onto the power unit and turn to lock ᕦ.
6 Select a speed or use the pulse control.
●
Liquids should be allowed to cool to room temperature
before blending.
hints
●
When making mayonnaise, put all the ingredients, except the oil,
into the liquidiser.
FP910 – Then with the machine running, pour the oil into the filler
cap and let it run through.
FP920 – Remove the filler cap. Then, with the appliance running,
add the oil slowly through the hole in the lid.
●
Thick mixtures, eg pates and dips, may need scraping down. If it’s
difficult to process, add more liquid.
●
When crushing ice use the pulse in short bursts.
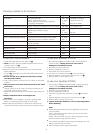
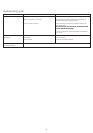
choosing a speed for all functions
Tool/Attachment Function Speed Maximum Capacities
K
nife Blade One Stage Cake Mix Min – Max 1.5Kg/3lb 5oz Total Wt
Pastry - rubbing fat into flour 5 – Max 340g/12oz Flour Wt
A
dding water to combine pastry ingredients 1 – 5
C
hopping/pureeing/pates Max 600g/1lb 6oz Meat
Knife Blade with maxi-blend canopy Soups – start at a low speed and move up to Max Min –Max 1.5 litres/2pts 12oz
W
hisk Egg Whites Max 6 Egg Whites
Egg & sugar for fatless sponges Max
C
ream 5 – Max 500 mls
Dough tool Yeasted mixes Max 600g/1lb 6oz
D
iscs – slicing/shredding/chipping Firm food items such as carrots, hard cheese. 5 – Max
S
ofter items such as cucumbers, tomatoes Min – 5
Rasping disc Parmesan cheese, Potatoes for German Max
potato dumplings.
Citrus Press Citrus fruits 1
Mini Bowl & knife All processing Max 200g/8oz
Liquidiser All processing Max 1.5 litres/2pts 12fl.oz
Mini chopper/Mill All processing Max
Centrifugal juicer Fruit & Vegetables Max 450g/1lb