


before plugging in
●
Make sure your electricity supply is
the same as the one shown on the
underside of your toaster.
●
This appliance complies with
European Economic Community
Directive 89/336/EEC.
Important – UK only
●
The wires in the cord are coloured
as follows:
Green and Yellow = Earth,
Blue = Neutral,
Brown = Live.
●
The appliance must be protected by
a 13A approved (BS1362) fuse.
●
WARNING: THIS APPLIANCE
MUST BE EARTHED.
Note:
●
For non-rewireable plugs the fuse
cover MUST be refitted when
replacing the fuse. If the fuse cover
is lost then the plug must not be
used until a replacement can be
obtained. The correct fuse cover is
identified by colour and a
replacement may be obtained from
your Kenwood Authorised Repairer
(see Service).
●
If a non-rewireable plug is cut off it
must be DESTROYED
IMMEDIATELY. An electric shock
hazard may arise if an unwanted
non-rewireable plug is inadvertently
inserted into a 13A socket outlet.
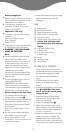
before using for the first time
1 Clip excess cord into the cord
storage clips in the base ᕡ.
2 Set the browning control to setting 5
and operate the toaster once on
high power without bread. Repeat
for low power.
Note: this will take longer on low
power.
●
As with all new heating elements,
your toaster may emit a slight
burning smell when it is first
switched on. This is normal and not
a cause for concern.
3Wash the sandwich cage and tongs
with hot soapy water, then dry
thoroughly.
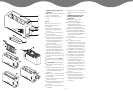
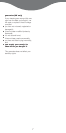
key
ቢ fascia panel
ባ adjustable slot lever
ቤ large removable crumb tray
ብ Peek & View™ carriage lever
ቦ browning control
ቧ cancel button with indicator light
ቨ button with indicator light
for toasting one side only eg
bagels
ቩ high power button with
indicator light
ቪ low power button with
indicator light
ቫ tongs
ቭ sandwich cage
ቮ cord storage
to use your toaster
Note: All filled food items such as
sandwiches should be toasted using
the sandwich cage see ‘to toast
food items using the sandwich
cage’.
1 Plug the toaster into the power
supply, an audible beep will be
heard.
2 Adjust the slot width to suit the food
item ᕢ. CAUTION: Take care
not to touch the fascia panel,
it may be hot.
3 Insert the bread, muffins, bagels,
croissants etc. Do not force food
items into the toaster.
4 Lower the carriage lever ᕣ.
5 Move the browning control to the
desired setting. Use a low browning
control setting for light toasting and
for thin or dry bread.
6 Select the desired button (i.e. high
power, low power or bagel). The
selected button and cancel button
lights will illuminate, an audible beep
will be heard and toasting will begin.
3