


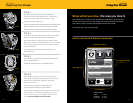


Brew what you love, the way you love it.
The new Keurig
®
Vue
™
Brewer, with Custom Brew Technology
™
, gives you total
control to brew your way: stronger, bigger, hotter and with more choices than
ever before. Enjoying a perfect cup of coffee has never been easier.
So what are you in the mood for today?
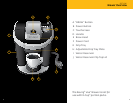
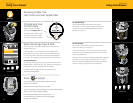
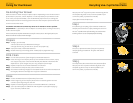
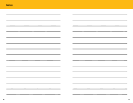
How to Use the Vue
™
Brewer Touchscreen
Strength Selection
(Coffee Only)
Beverage Type
Available Range
Coffee 4 - 18 oz.
Tea/Other 6 - 12 oz.
Hot Cocoa 6 - 10 oz.
Beverage Size
Beverage Category
oz8
8 oz
Hot Cocoa
Tea +Tea/Other
Strong
Coffee
Brew Over IceCafé
Coffee & Tea
Coffee & Tea
oz8
8 oz
Hot Cocoa
Tea +Tea/Other
Strong
Coffee
Brew Over IceCafé
Coffee & Tea
Coffee & Tea
oz8
8 oz
Hot Cocoa
Tea +Tea/Other
Strong
Coffee
Brew Over IceCafé
Coffee & Tea
Coffee & Tea
oz8
8 oz
Hot Cocoa
Tea +Tea/Other
Strong
Coffee
Brew Over IceCafé
Coffee & Tea
Coffee & Tea
oz8
8 oz
Hot Cocoa
Tea +Tea/Other
Strong
Coffee
Brew Over IceCafé
Coffee & Tea
Coffee & Tea
oz8
8 oz
Hot Cocoa
Tea +Tea/Other
Strong
Coffee
Brew Over IceCafé
Coffee & Tea
Coffee & Tea
oz8
8 oz
Hot Cocoa
Tea +Tea/Other
Strong
Coffee
Brew Over IceCafé
Coffee & Tea
Coffee & Tea
oz8
8 oz
Hot Cocoa
Tea +Tea/Other
Strong
Coffee
Brew Over IceCafé
Coffee & Tea
Coffee & Tea
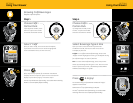
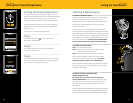
Step 1
Remove all adhesive tape from Brewer and label
from Touchscreen. Behind the Brewer is a convenient
compartment to hold the Power Cord for storage.
Plug cord into grounded outlet.
If Brewer has been exposed to temperatures below freezing, allow
Brewer at least two hours to reach room temperature before
brewing. A frozen or extremely cold Brewer will not operate.
Step 2
Carefully remove Water Reservoir Lid. Remove the Water
Reservoir by lifting up and away from the Brewer.
Rinse Water Reservoir with fresh water. Return Water
Reservoir to Brewer. Fill the Water Reservoir to the max fill
line. Bottled or filtered water is recommended. Place Lid
on Water Reservoir.
See page 16 for options for how to add water to the
Water Reservoir.
Step 3
Place a 10 oz. mug toward the back of the Drip Tray and
press the Power Button.
The Brewer Handle should be in the lowered position.
Step 4
When the Brewer is first turned on, the Touchscreen
will indicate “Preheating” as the Brewer heats the water.
Wait until the Touchscreen indicates “Lift to Brew”
(about four minutes).
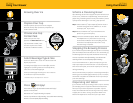
If there is not enough water in the Water Reservoir,
the Touchscreen will indicate “Please Add Water.”
Lift and lower the Brewer Handle, then press the flashing
“BREW” Button. Your Brewer will dispense 8 oz. of hot
water into your mug. Once complete, discard the hot
water. You are ready for your first brew!
SECTION 3
Using Your Brewer
SECTION 2
Preparing Your Brewer
SECTION 3
Using Your Brewer
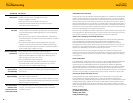
Step 1
Step 2
Step 3
Step 4
8 9