


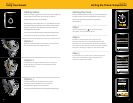


Please Add
Water
SECTION 3
Using Your Brewer
SECTION 4
Setting the Time & Temperature
Adding Water
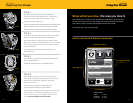
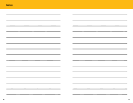
When the water supply is low, the Touchscreen will display
as pictured and the Water Reservoir light will flash.
Bottled or filtered water is recommended.
When brewing at sizes larger than 12 oz., if the Brewer senses the
water level is low, the brewing process will stop until the Water
Reservoir is refilled. Once enough water has been added, the
brewing process will resume.
Do not remove the Water Reservoir during the brewing process.
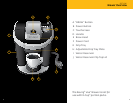
There are three options for filling the Water Reservoir:
Option 3
You may also remove the Water Reservoir from
the Brewer to fill it. Replace the Lid and return
the filled Water Reservoir to the Brewer.
Do not remove the Water Reservoir during the brewing process.
Lift to Brew
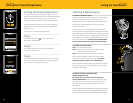
Setting the Clock
When the Brewer is first turned on, the clock will appear on
the Touchscreen. Follow the steps below to set the time.
You must set the clock if you will be using the Auto
On/Off feature.
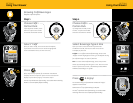
Step 1
Select the settings icon
on the Touchscreen,
then select “Time” and finally “Clock.”
Step 2
The next screen will allow you to set the clock.
Use the + and - buttons to set the appropriate time.
The clock is on a 12h setting and will switch to AM/PM
once the 12h mark is passed. You have a choice to display
the clock in “Analog” or “Digital” on the Touchscreen.
Step 3
Once the time is set, select “ON” to save and you will
return to the Time Menu. Select the back arrow
to return to the previous screen.
Temperature
Settings
Time
Auto On
Auto Off
Energy Saver
Time
Clock
Set Clock to:
–
+
H M
–
+
Analog Digital
ON
OFF
0:00AM
Please Add
Water
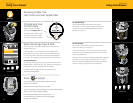
Option 1
Remove the Water Reservoir Lid and pour water directly
into the Water Reservoir. Replace the Lid.
Option 2
Instead of removing the Water Reservoir Lid, you can
lift the Flip Top. Pour water into the Water Reservoir.
Lower the Flip Top.
16 17