


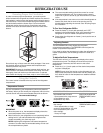

12
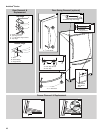
Adjust the Door
Depending on your model, your refrigerator may have two
(Style 1) or four (Style 2) adjustable rollers located at the base of
the refrigerator. If your refrigerator seems unsteady or you want
the door to close easier, adjust the refrigerator's tilt using the
instructions below.
1. Move the refrigerator into its final location.
2. Remove the base grille. Grasp the grille firmly and pull it
toward you.
3. Remove the bracket covers. Insert the eraser end of a pencil
in the cover notch. Apply slight downward pressure to the
notched side of the cover while swinging it off.
4. Using a screwdriver or ³⁄₈" hex driver, turn the roller
adjustment screw(s) on each side to raise or lower that side of
the refrigerator.
NOTE: Having someone push against the top of the
refrigerator takes some weight off the adjustment screws and
rollers. This makes it easier to turn the screws.
■ To raise, turn the roller adjustment screw to the right.
■ To lower, turn the roller adjustment screw to the left.
NOTE: It may take several turns of the roller adjustment
screw to adjust the tilt of the refrigerator.
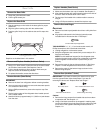
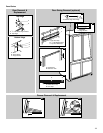
Style 1 - Front leveling
Style 2 - Front and rear leveling
5. Open the door again to make sure that it closes as easily as
you like. If not, tilt the refrigerator slightly more to the rear by
turning both front adjustment screws to the right. It may take
several more turns, and you should turn both adjustment
screws the same amount.
6. Lower the stabilizing foot by turning it clockwise until it is
firmly against floor.
7. Turn the front adjustment screws counterclockwise to allow
the full weight of the refrigerator to rest on the stabilizing feet.
8. Replace the bracket covers. Place each bracket cover into
the outer edge, swing the cover toward the cabinet and snap
it into place.
9. Replace the base grille.
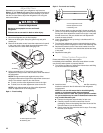
Water System Preparation
Please read before using the water system.
Immediately after installation, follow the steps below to make
sure that the water system is properly flushed.
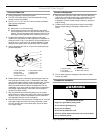
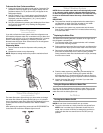
1. Turn off the ice maker by opening the freezer door and lifting
up the wire shutoff arm as shown.
2. Install the interior water filter. The interior water filter mounting
bracket is located on the left side wall of the refrigerator
compartment.
NOTE: Do not use with water that is microbiologically
unsafe or of unknown quality without adequate
disinfection before or after the system. Systems certified
for cyst reduction may be used on disinfected waters that
may contain filterable cysts.
■ Remove blue bypass cap and retain for later use.
■ Carefully remove the interior water filter from its
packaging. Remove the sealing label from the end of the
filter and insert it into the filter head.
■ Gently rotate the filter clockwise until it stops. Then snap
the filter cover closed.
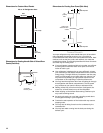
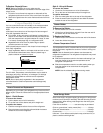
A.Roller adjustment screw
B.Stabilizing foot
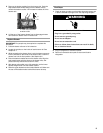
WARNING
Excessive Weight Hazard
Use two or more people to move and install
refrigerator.
Failure to do so can result in back or other injury.
A
B
A.Front adjustment screw
B.Rear adjustment screw
C.Stabilizing foot
A B AB
CC