


19
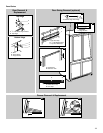
To Replace Crisper(s) Cover:
NOTE: Before reinstalling the cover, make sure the
U-shaped reinforcement bar is reinstalled in the front edge of the
crisper cover.
1. Fit back of cover frame into supports on side walls of the
refrigerator and lower the front of the cover frame into place.
2. Slide rear of glass insert into cover frame and lower front into
place.
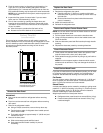
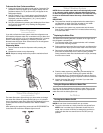
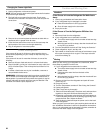
Crisper Humidity Control
You can control the amount of humidity in the moisture-sealed
crisper. Adjust the control to any setting between LOW and
HIGH.
LOW (open) lets moist air out of the crisper for best storage of
fruits and vegetables with skins.
■ Fruit: Wash, let dry and store in refrigerator in plastic bag or
crisper. Do not wash or hull berries until they are ready to use.
Sort and keep berries in original container in crisper, or store
in a loosely closed paper bag on a refrigerator shelf.
■ Vegetables with skins: Place in plastic bags or plastic
container and store in crisper.
HIGH (closed) keeps moist air in the crisper for best storage of
fresh, leafy vegetables.
■ Leafy vegetables: Wash in cold water, drain and trim or tear
off bruised and discolored areas. Place in plastic bag or
plastic container and store in crisper.
Temperature-Controlled Drawer
The full-width, temperature-controlled drawer can be used to
store large party trays, deli items, or beverages. For storage
flexibility the drawer features a divider and an adjustable
temperature control.
NOTE: Do not place leafy vegetables in the temperature-
controlled drawer. Colder temperatures could damage leafy
produce.
Drawer Removal and Replacement
Depending on your model, your refrigerator may have one of two
drawer styles. Follow the instructions for the appropriate drawer
style.
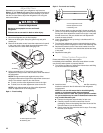
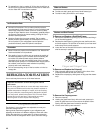
Style 1 - Flat-lid Drawer
To remove the drawer:
1. Pull the drawer out to its full extension.
2. Tilt up the front of the drawer and pull it straight out.
To replace the drawer:
1. Push the metal glide rails to the rear of the refrigerator.
2. Place the drawer onto the glide rails and slide the drawer
toward the rear of the refrigerator.
Style 2 - Lift-up-lid Drawer
To remove the drawer:
1. Lift the lid. Pull the drawer out to its full extension.
2. Tilt up the front of the drawer and pull it straight out.
To replace the drawer:
1. Push the metal glide rails to the rear of the refrigerator.
2. Place the drawer onto the glide rails and slide the drawer
toward the rear of the refrigerator.
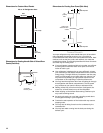
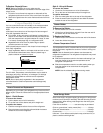
Drawer Divider
To Remove the Divider:
1. Pull the drawer out to its full extension.
2. Lift the front of the divider to unhook it from the rear wall of
the drawer and lift the divider out.
To Replace the Divider:
1. Hook the back of the divider over the rear wall of the drawer.
2. Lower the divider into place.
Drawer Temperature Control
The temperature control, located under the lid on the right-hand
side of the drawer, regulates the amount of cold air coming into
the drawer.
NOTE: Cold air directed into the drawer can decrease the
refrigerator temperature. The refrigerator temperature may need
to be adjusted.
■ Slide the temperature control to the least cold setting if you
want the drawer to be the same temperature as the
refrigerator compartment.
■ Slide the temperature control to a colder setting when you
want the drawer to be colder than the refrigerator
compartment.
NOTE: Use the coldest setting when storing meats.
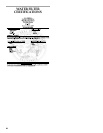
Meat Storage Guide
Store most meat in original wrapping as long as it is airtight and
moisture-proof. Rewrap if necessary. See the following chart for
storage times. When storing meat longer than the times given,
freeze the meat.
Fresh fish or shellfish..................use same day as purchased
Chicken, ground beef, variety meats (liver)...............1-2 days
Cold cuts, steaks/roasts ...........................................3-5 days
Cured meats............................................................7-10 days
Leftovers - Cover leftovers with plastic wrap, aluminum foil, or
plastic containers with tight lids.
LOW
LOW
HIGH
HIGH