


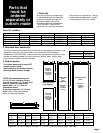


must be brass
or nickel plated
brass with
7/16-24 thread.
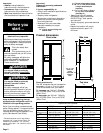
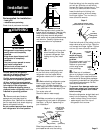
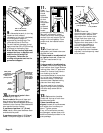
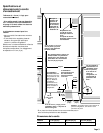
1. Remove and save literature
package and parts bag taped to
refrigerator door. Remove four brackets
(two on each side) that attach shipping
base to refrigerator bottom.
Do not remove tape and door bracing
until refrigerator is in final position.
Installation
steps
Do Not lower the refrigerator
against the shipping base when
removing the shipping base.
Do Not remove protective film until
refrigerator is in operating position.
All four leveling legs must contact
the floor to support and stabilize the
full weight of the refrigerator.
Keep cardboard shipping piece or
plywood under refrigerator until it is
installed in operating position.
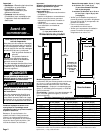
Parts supplied for installation:
• base grille
• miscellaneous parts bag
Check that all parts were included.
4. Place pieces of shipping carton
on the floor when rolling dolly and
refrigerator into the house. Move
refrigerator close to built-in opening.
corner
post over
handle
Page 9
7. Set power
switch at top of
cabinet to “OFF”
position.
Plug power supply cord into
grounded outlet. Install
retainer on grounded
outlet using screw
from parts bag.
8. Place top of cardboard
carton or plywood under refrigerator.
Remove dolly. Open appliance doors
and remove all boxes, parts packages
and packing materials from refrigerator
and freezer compartments. Do Not
remove protective film.
To prevent floor damage make sure
levelers are raised (not touching the
floor) and refrigerator is on rollers
before moving.
Move the refrigerator straight back and
evenly into the opening. Check that:
• water hookup tubing is not kinked.
• power supply cord is on top of
refrigerator next to cover.
retainer
grounded
outlet
power
supply
cord
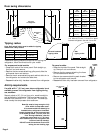
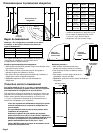
2. Place appliance dolly under the
freezer side of refrigerator. Pass the dolly
strap under the handles then loosely
wrap dolly strap around refrigerator.
Insert carton corner posts between strap
and side trim. Carefully tighten strap,
making sure side trim is protected.
corner posts
over side trim
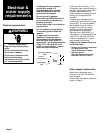
Tip Over Hazard
Refrigerator is top heavy and tips
easily when not completely
installed.
Keep doors taped closed until
refrigerator is completely
installed.
Use two or more people to move
and install refrigerator.
Failure to do so can result in
death or serious injury.
WARNING
C
R
I
T
I
C
A
L
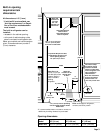
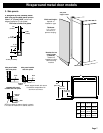
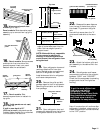
3. If 32” (81 cm) long min.
wood board(s) will be used
to prevent refrigerator from
tipping during use, install
now.
S
T
E
P
5. Before attaching refrigerator water
line to water supply, flush at least 2
quarts (1.9 L) of water through the
water supply and into a bucket to get rid
of any particles in the water supply line.
Turn water valve off.
Check for leaks in water supply.
Style 1
bulb
nut (provided)
ferrule
(purchased)
coupling
(purchased)
nut
(purchased)
tubing from
refrigerator
Push the tubing into the coupling as far
as it will go. Slide the nut and ferrule
forward and finger tighten the nut. Turn
nut two (2) more turns with wrench.
Insert the bulb end of tubing into
purchased coupling, slide nut down
and finger tighten. Turn nut two (2)
more turns with wrench.
Style 2
nut
(provided)
tubing from
refrigerator
bulb
valve must be brass or nickel
plated brass with 7/16-24 thread.
Push the bulb end of the tubing into the
water valve as far as it will go. Slide the
nut forward and finger tighten. Tighten
nut two (2) more turns with wrench.
6. Make connection to refrigerator.
Untape tubing from back of refrigerator.
Use Style 1 or Style 2, depending on
your installation.
Slide the purchased nut then the
purchased ferrule onto the tubing.