


7
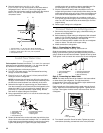
Recommended grounding method
A 115 Volt, 60 Hz., AC only 15 or 20 ampere fused, grounded
electrical supply is required. It is recommended that a separate
circuit serving only your refrigerator be provided. Use an outlet
that cannot be turned off by a switch. Do not use an
extension cord.
IMPORTANT:
If this product is connected to a
GFCI (Ground Fault Circuit Interrupter) protected outlet, nuisance
tripping of the power supply may occur, resulting in loss of
cooling. Food quality and flavor may be affected. If nuisance
tripping has occurred, and if the condition of the food appears
poor, dispose of it.
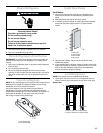
NOTE:
Before performing any type of installation, cleaning, or
removing a light bulb, turn the control (Thermostat, Refrigerator
or Freezer Control depending on the model) to OFF and turn OFF
the Power On/Off Switch (see “Power On/Off Switch” section) or
disconnect power at the circuit breaker box.
When you are finished, turn ON the Power On/Off Switch (see
“Power On/Off Switch” section) or reconnect power at the circuit
breaker box. Then reset the control (Thermostat, Refrigerator or
Freezer Control depending on the model) to the desired setting.
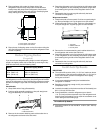
Water Supply Requirements
Read all directions carefully before you begin.
IMPORTANT:
■
If you turn the refrigerator on before the water line is
connected, turn the ice maker OFF.
■
All installations must meet local plumbing code requirements.
■
Use copper tubing and check for leaks. Install copper tubing
only in areas where temperatures will remain above freezing.
NOTE:
Your refrigerator dealer has a kit available with a
¹⁄₄
in.
(6.35 mm) saddle-type shutoff valve, a union, and copper tubing.
Before purchasing, make sure a saddle-type valve complies with
your local plumbing codes. Do not use a piercing-type or
³⁄₁₆
in.
(4.76 mm) saddle valve which reduces water flow and clogs more
easily.
Cold water supply
Connect the ice maker to a cold water line with water pressure
between 15 and 100 psi (103 - 690 kPa). If you have questions
about your water pressure, call your utility company.
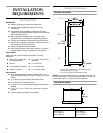
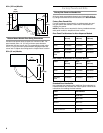
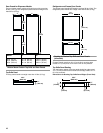
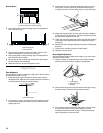
Tipping Radius
Before bringing refrigerator into home, be sure you have
adequate ceiling height to stand refrigerator upright.
NOTES:
■
Dolly wheel height must be added to tipping radius when a
dolly is used.
■
To reduce the tipping radius, see the “Reducing Tipping
Radius” section.
Forward Tipping Radius (same for all models)
Side Tipping Radius (see chart following)
Side Tipping Radius:
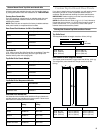
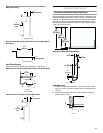
Door Swing Dimensions
Side by Side Door Swing Dimensions
Location must permit doors to open to a minimum of 90°. Allow
4
¹⁄₂
in. (11.4 cm) minimum space between refrigerator side and
corner wall. To adjust door swing see the “Adjust Doors” section.
36 in. (91 cm) Models
42 in. (106 cm) Models
87
1
/
4
"
(222 cm)
Model Tipping Radius A
36 in. (91.4 cm)
42 in. (106.7 cm)
48 in. (121.9 cm)
90
¹⁄₂
in. (229.9 cm)
93 in. (236.2 cm)
96 in. (243.8 cm)
A
130˚
130˚
90˚
90˚
110˚
110˚
43
1
/
2
"
(110 cm)
40"
(102 cm)
19
3
/
4
"
(50 cm)
14
1
/
2
"
(37 cm)
36
1
/
16
"
(92 cm)
38
1
/
2
"
(98 cm)
130˚
130˚
90˚
90˚
110˚
110˚
47"
(119 cm)
42
9
/
16
"
(108 cm)
23
1
/
4
"
(59 cm)
17
1
/
2
"
(44 cm)
38"
(97 cm)
41"
(104 cm)