


19
GB
* Depending on model and options
Troubleshooting
Customer service and type plate
If none of the above causes apply and you cannot
rectify the fault yourself, or if the temperature display
reads "F 0" to "F 5", this means that there is a fault. Please
contact your nearest customer ser-vice department (see
enclosed list for addresses), indicating the fault number
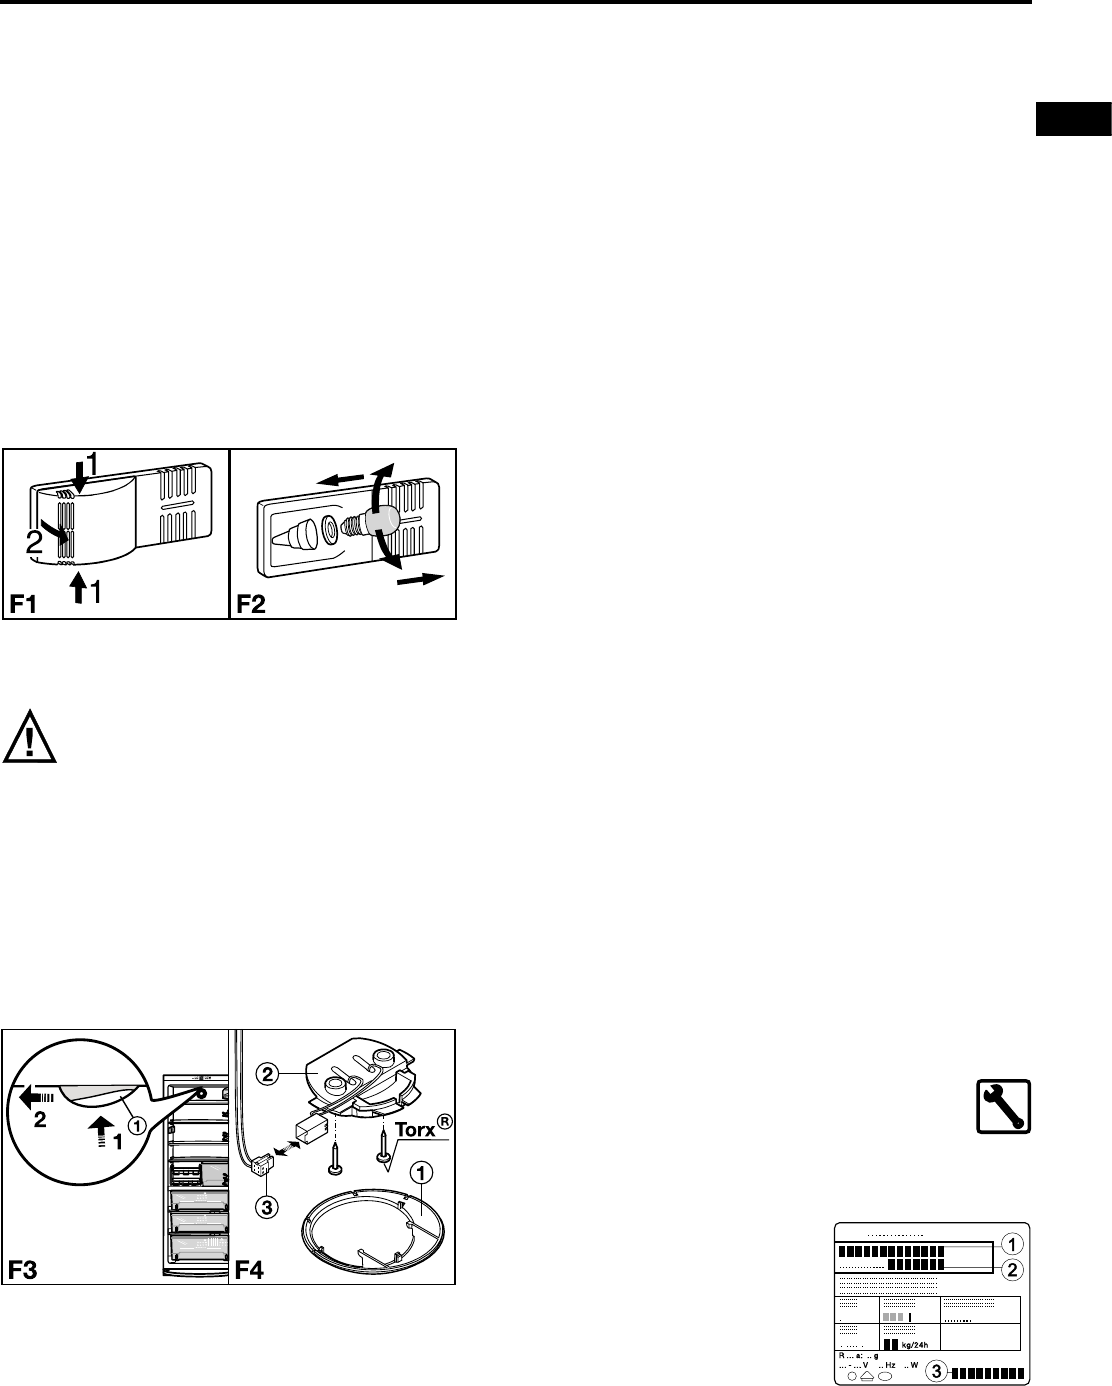
and the
type designation 1,
service number 2 and
appliance number 3
on the type plate. This will help us
to provide you with a faster and
more accurate service. The type
plate is located on the inside left of
the appliance next to the bottom
BioFresh drawer.
Leave the appliance shut until the customer service engineer
arrives so as to prevent any further cold loss.
Your appliance is designed and manufactured for a long life
span and reliable operation.
If a malfunction nonetheless occurs during operation, check
whether it is due to an operating error. Please note that even
during the warranty period the resultant servicing costs in
this case will have to be borne by the owner.
You may be able to rectify the following faults by checking
the possible causes yourself:
Malfunction Possible cause and remedy
_______________________________________________
Appliance does not work, display is off
- Is the appliance switched on properly?
- Is the mains plug properly inserted in the socket?
- Is the socket fuse intact?
The interior light does not come on
- Is the appliance switched on?
- Has the door been open for more than 15 minutes?
- The bulb/lighting unit* is defective. Change the bulb/light-
ing unit* as described in "Interior light".
Loud running noise
- Is the appliance standing firmly on the floor, or does the
compressor cause nearby items of furniture or objects to
vibrate? If necessary, move the appliance slightly, align by
adjusting the adjustable feet, or move bottles and contain-
ers apart.
- Burbling noises are normal. These are caused by the
refrigerant flowing round the refrigerant circuit.
A short clicking sound: This will be heard whenever the
refrigeration unit (the motor) switches on or off automati-
cally.
Motor noise: This will be slightly louder for a brief period
when the refrigeration unit switches on.
The audible warning signal sounds
- Is the appliance closed properly? Check the appliance as
described in "Audible warning signal".
The temperature is not cold enough
- Is the temperature setting correct? If necessary, set a
lower temperature and check the display after 24 hours.
- Does the door close properly?
- Is the appliance sufficiently well ventilated?
Clear ventilation grilles if necessary.
- Is the ambient temperature too hot? (See "Safety regula-
tions")
- Has the appliance been opened too often or left open too
long?
- If applicable, wait until the appliance reaches the required
temperature itself.
This switches off automatically after the door has been
opened for approx. 15 minutes. If it does not switch on when
the door is opened briefly, but the temperature setting dis-
play is working, the interior light may be defective.
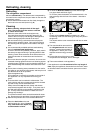
Replacing the bulb*:
W Bulb data: max. 25 W; current and voltage must agree
with the details on the type plate. Only use bulbs of the
same size. Bulb fitting: E 14.
W Switch off the appliance. Disconnect from the mains or
remove or unscrew the fuse.
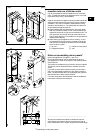
W Press the light cover together at the sides as in fig. F1 (1).
Lift it out and unclip at back (2).
W Replace the bulb as in fig. F2. To counteract the friction
seal, turn with slightly more pressure. When inserting, en-
sure that the seal is properly in place in the lamp socket.
W Clip the back end of the cover in and clip the sides into
place.
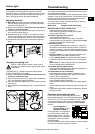
Changing the lighting unit*:
Caution - class 1M laser radiation. When cover is
removed, do not look directly at light through optical
instruments.
The lighting unit 2, dissipator with light emitting diode
(LED), is available from your dealer.
W Switch off the appliance. Disconnect from the mains or
remove or unscrew the fuse.
W Fig. F3: Press the bulb cover 1 against the compartment
roof 1 and release by pulling forwards 2.
W Fig. F4: Unscrew the lighting unit 2 and loosen the cable
connector 3.
W Re-assemble with new lighting unit 2, working in reverse
order.
Interior light*