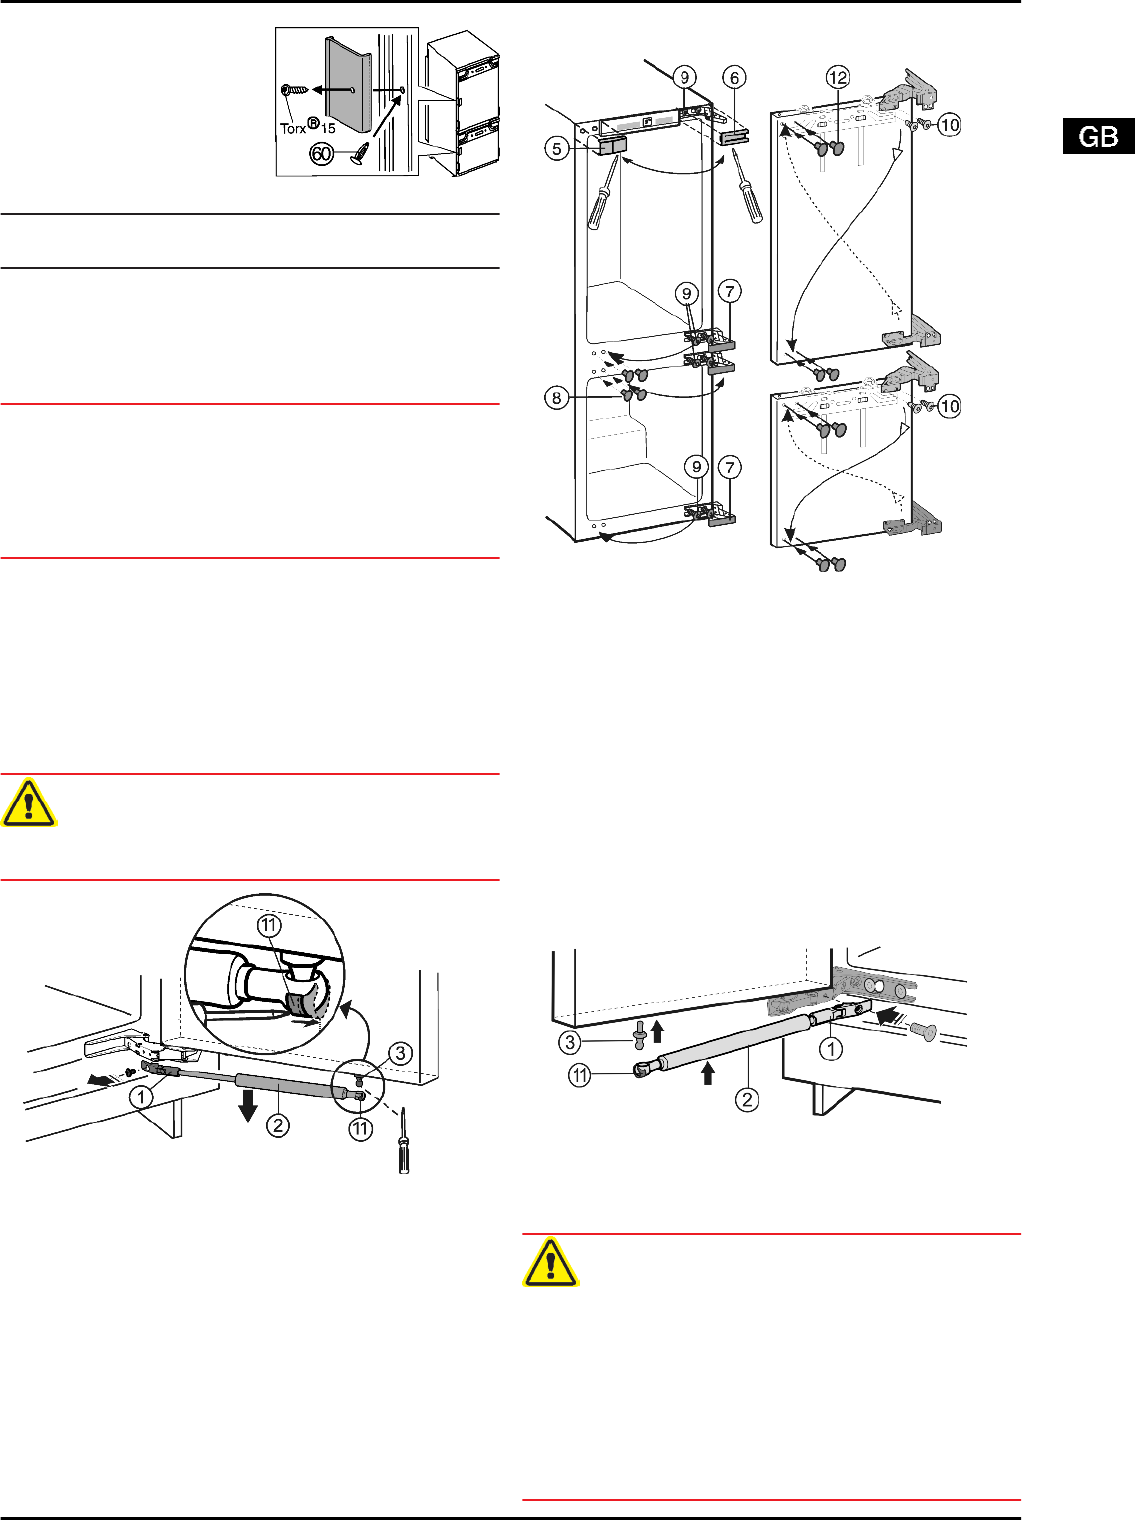
u
Unscrew the red transport
lock. Close the vacated
retaining hole using the
stopper (60).
u
Dispose of packaging material (see 4.6) .
Note
u
Clean the appliance (see 6.3) .
If the appliance is installed in a very damp environment,
condensate may form on the outside of the appliance.
u
Always see to good ventilation at the installation site.
4.3 Changing the door hinges
NOTICE*
Risk of damage to side-by-side appliances due to condensa-
tion!
When a side-by-side appliance (S…) is fitted together with a
second appliance (as a SBS combination), the door hinges
must remain as delivered.
u
Do not change over the door hinges.
Make sure the following tools are to hand:
q
Spanner 13
q
Cordless screwdriver Torx® 15, 20, 25, 30
Slide the appliance 2/3 of the way into the recess.
Pull out the mains plug.
Open the doors.
4.3.1 To detach the soft stop mechanism*
CAUTION
Risk of injury if soft stop contracts!
u
Detach with care.
Fig. 3
u
Push tension spring
Fig. 3 (11)
outwards, using a screw-
driver.
u
Lower soft stop mechanism
Fig. 3 (2)
for removal.
u
Unscrew holder
Fig. 3 (1)
.
u
Unscrew the ball stud
Fig. 3 (3)
(Torx® 20).
4.3.2 To change the hinges
Fig. 4
u
Lift off the covers
Fig. 4 (5,6,7,8)
forwards using a flat-blade
screwdriver.
u
Loosen the top and bottom screws
Fig. 4 (9)
on the appli-
ance body, without removing them.
u
Pull the doors outwards and detach them.
u
Transfer the screws
Fig. 4 (9)
to the opposite side and
screw them in a little.
u
Undo the screws
Fig. 4 (10)
and change over the hinges
diagonally.
The screws
Fig. 4 (10)
are self-tapping: use a cordless screw-
driver.
u
Screw the hinges firmly into place with 4 Nm.
u
Place plugs
Fig. 4 (12)
in the now unused fastening holes.
u
Attach the doors to the pre-fitted screws
Fig. 4 (9)
and
tighten the screws firmly with 4 Nm.
4.3.3 Re-fit the soft stop mechanism*
Fig. 5
u
Screw the ball stud
Fig. 5 (3)
firmly into the new fastening
hole with 4 Nm (Torx® 20).
u
Push tension spring
Fig. 5 (11)
inwards again.
u
Screw the mount
Fig. 5 (1)
firmly into place with 3 Nm.
u
Attach soft stop mechanism
Fig. 5 (2)
to ball stud.
WARNING
Risk of injury due to the door dropping out!
If the fastening parts are not screwed into place firmly enough,
the door may drop out. This may lead to severe injuries. What
is more, the door may not close and therefore the appliance
may fail to cool properly.
u
Screw the hinges and the ball journal of the soft stop mecha-
nism firmly into place, with 4 Nm.
u
Screw the holder of the soft stop mechanism firmly into
place, with at least 3 Nm.
u
Check all of the screws and retighten if necessary.
Putting into operation
5


