


CAUTION identifies a dangerous situation
which, if not obviated, may result in
minor or medium bodily injury.
NOTICE identifies a dangerous situation
which, if not obviated, may result in
damage to property.
Note identifies useful information and tips.
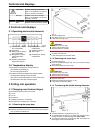
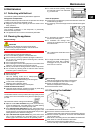
3 Controls and displays
3.1 Operating and control elements
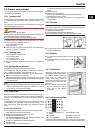
Fig. 3
(1) On/Off button, refriger-
ator compartment
(6) Setting button, freezer
compartment
(2) Fan button (7) SuperFrost buttont
(3) Setting button, refriger-
ator compartment
(8) Alarm button
(4) Refrigerator compart-
ment temperature
display
(9) On/Off button, freezer
compartment
(5) Freezer compartment
temperature display
3.2 Temperature display
The following are displayed in normal operation:
-
the set freezing temperature
-
the set cooling temperature
The freezer compartment temperature display flashes:
-
the temperature setting is being changed
-
after switch-on the temperature is not yet cold enough
-
the temperature has risen several degrees
4 Putting into operation
4.1 Changing over the door hinges
Ensure that the following tools are to hand:
q
Torx 25
q
Torx 15
q
Screwdriver
q
Cordless screwdriver, if necessary
q
Second person for fitting work, if needed
4.1.1 Detaching the upper door
Note
u
Remove any food from the door racks before removing the
door, so that no food falls out.
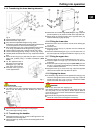
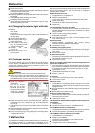
Fig. 4
u
Close the upper door.
u
Pull off the cover
Fig. 4 (1)
forwards and upwards.
u
Lift off the cover
Fig. 4 (2)
CAUTION
Risk of injury if the door tips!
u
Take good hold of the door.
u
Set down the door carefully.
u
Unscrew the upper turn hinge
Fig. 4 (3)
(2 Torx 25)
Fig. 4 (4)
and raise it for removal.
u
Lift up the upper door and set it aside.
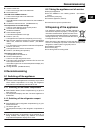
4.1.2 Detaching the lower door
u
Close the lower door.
u
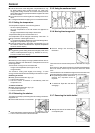
Draw the middle bearing pin
Fig. 5 (11)
out of the turn hinge
and lower door.
u
Remove the plastic cap
Fig. 5 (10)
.
CAUTION
Risk of injury if the door tips!
u
Take good hold of the door.
u
Set down the door carefully.
u
Open the lower door.
u
Detach the middle turn hinge
Fig. 5 (13)
.
u
Lift up the door and set it aside.
4.1.3 Transferring the middle bearing elements
Fig. 5
u
Carefully detach the cover panel
Fig. 5 (12)
.
u
Turn the middle turn hinge
Fig. 5 (13)
through 180° and screw
it firmly into place on the new hinge side (with 4 Nm).
u
Turn the cover panel
Fig. 5 (12)
through 180° and snap it into
place again on the new handle side.
Controls and displays
4