Impinger X2 – Digital Service Manual – Dom & Int’l
20
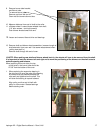
5. Remove pilot tube from gas valve. Disconnect pipe union at the burner and at the inlet side of the main
gas valve. Loosen pipe clamp and remove valves and piping assembly.
6. Remove piping from old valve and reassemble in reverse order.
7. Check all gas line fittings for leaks and check system operation.
GAS VALVE – REPLACEMENT
1. Shut off power at main breaker.
2. Shut off the gas supply to the oven and disconnect the flexible gas hose from the oven.
3. Remove control box cover.
4. Disconnect all wiring from the temperature regulation valve, modulating gas valve and the main gas
valve. Mark all wiring for reassembly.
5. Remove pilot tube from gas valve. Disconnect pipe unions at the burner and at the inlet side of the main
gas valve. Loosen pipe clamp and remove valves and piping assembly.
6. Remove piping from old valve and reassemble in reverse order.
7. Check all gas line fittings for leaks and adjust manifold pressure on gas valve. Refer to the specification
plate on the oven for proper gas manifold pressure. Check system operation.
MODULATING GAS VALVE – REPLACEMENT
1. Shut off power at main breaker.
2. Shut off the gas supply to the oven and disconnect the flexible gas hose from the oven.
3. Remove control box cover.
4. Disconnect all wiring from the temperature regulation valve, modulating gas valve and the main gas
valve. Mark all wiring for reassembly.
5. Remove pilot tube from gas valve. Disconnect pipe unions at the burner and at the inlet side of the main
gas valve. Loosen pipe clamp and remove valves and piping assembly.
6. Remove piping from old valve and reassemble in reverse order.
7. Check all gas line fittings for leaks and adjust manifold pressure on gas valve. Refer to the specification
plate on the oven for proper gas manifold pressure. Check system operation.
MAIN BURNER ORIFICE – REPLACEMENT
1. Shut off power at main breaker.
2. Shut off the gas supply to the oven and disconnect the flexible gas hose from the oven.
3. Remove control box cover and control box front cover.
4. Remove pilot tube from gas valve. Disconnect pipe union at burner, loosen pipe union at inlet to gas
valve, loosen pipe clamp and move piping away from burner.
5. Remove two mounting nuts from burner flange and remove burner flange.
6. Remove main burner orifice from the burner flange.
7. Reassemble in reverse order.
8. Check all gas line fittings for leaks and check system operation.
PILOT ORIFICE – REPLACEMENT
1. Shut off power at main breaker.
2. Shut off the gas supply to the oven and disconnect the flexible gas hose from the oven.
3. Remove control box cover and control box front cover.
4. Remove pilot tube from gas valve. Disconnect pipe union at burner and at inlet to main gas valve. Loosen
pipe clamp and move piping away from burner.
5. Disconnect wiring from burner and mark wiring for reassembly.
6. Remove four screws from burner end plate and remove burner assembly from burner housing.
7. Remove pilot tube from igniter assembly and remove pilot orifice.
8. Reassemble in reverse order. Check all gas line fittings for leaks. Check system operation.
SPARK IGNITER – REPLACEMENT
1. Shut off power at main breaker.
2. Shut off the gas supply to the oven and disconnect the flexible gas hose from the oven.
3. Remove control box cover and control box front cover.


