


WARNING: THIS UNIT SHOULD NOT UNDER
ANY CIRCUMSTANCES, BE UNGROUNDED.
Remove Packaging
Your appliance has been packed for shipment with all
parts that could be damaged by movement securely fas-
tened. Before using, be sure all packing materials and
tape have been removed.
Important
Keep your carton packaging until your appliance has
been thoroughly inspected and found to be in good con-
dition. If there is damage, the packaging will be needed
as proof of damage in transit.
Note to Customer
This merchandise was carefully packed and thoroughly
inspected before leaving our plant. Responsibility for its
safe delivery was assumed by the carrier upon accept-
ance of the shipment. As directed on the side of your
packing carton, claims for loss or damage sustained in
transit must be made on the carrier as follows:
Exterior Damage
Make thorough damage notation on your delivery receipt
and have driver acknowledge by signature and date.
Send a written request asking for an inspection report
from carrier. Include the name of carrier representative
and the date the inspection was requested. Retain
inspection report and receipt for filing of a claim.
Concealed Damage
This must be reported to the carrier within fifteen days.
Obtain inspection report from the carrier. Retain the
inspection report for filing the claim. DO NOT RETURN
DAMAGED MERCHANDISE TO MANUFACTURER -
FILE THE CLAIM WITH THE CARRIER.
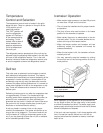
Unit Installation Location
Locate your appliance in the most convenient place
near a grounded outlet. If possible, place your unit out
of direct sunlight and away from heat sources such as a
radiator, stove, oven, or furnace duct.
Your refrigerator has a fan-cooled condenser and can
be built-in. No ventilation is required but the front grille
must be kept clear for proper air movement and unit
operation.
To build in, the opening must be at least 24"wide x 34-
3/4" high x 24" deep with ample provision for wiring. In
addition, consideration should be given to the appli-
ance's removal for routine cleaning and access to the
waterline fittings.
Icemaker Plumbing
Observe and follow all local code(s) when installing
appliance.
The only connection necessary to make the icemaker
function is to connect the supplied copper water tube fit-
ting to your home's cold water supply line.
Use ¼-inch copper water tubing only and the supplied
connection fittings to connect to the water valve's ¾”
garden hose fitting located at the rear of the unit.
Additional connection parts are available at a local hard-
ware-plumbing store. Water pressure must be at a mini-
mum of 20 psi for proper operation.
Make certain all water connections are watertight after
installation. Form the tubing so that it will not vibrate
against the cabinet body or kink when your refrigerator
is set in position.
Electrical and Grounding
The icemaker is already connected to the refrigerator's
wiring. The appliance power cord must be connected to
a power source of 120 Volts AC, 60 Hz, properly
grounded 15 Amp circuit.
1
Caution: Never pour liquids directly onto the
light assembly.
Observe and follow all local Electrical code(s) when
installing appliance.
WARNING: THIS UNIT SHOULD NOT UNDER
ANY CIRCUMSTANCES, BE UNGROUNDED.