


20
SECTION 3
OPERATION
WARNING
OVEN MUST BE KEPT CLEAR OF
COMBUSTIBLES AT ALL TIMES.
III. STEP-BY-STEP OPERATION
A. Startup Procedures
Daily Startup
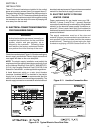
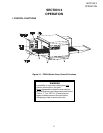
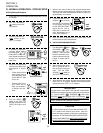
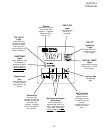
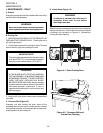
1. Turn the BLOWER switch (Figure 3-6) to the “ON” or “I”
position. This starts the main blower fan and the cooling
fans. The blower circulates air through the air fingers and
must stay on during the cooking or baking process.
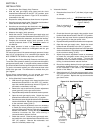
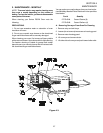
2. Check to see if the cooling fans (see Figure 1-8) are
operating when the blower switch (see Figure 3-6) is turned
“ON” or “I”. The cooling fans cool the control components
and blower motor. The cooling fans, located at the rear of
the oven blows air into and through the cabinet. Air is
exhausted through the front of the cabinet and also out the
front of the oven. Refer to Daily Maintenance Section for
fan intake checking procedure.
IMPORTANT NOTE
The cooling fan operates when the BLOWER
switch is turned “ON” or “I”. It must operate to keep
the control console below 140°F (60°C).
3. Turn the CONVEYOR switch (Figure 3-6) to the “ON” or
“I” position. This starts the conveyor belt moving through
the oven. Set the conveyor speed for the desired baking
time. Refer to the following Procedures E, F and G.
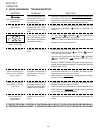
4. Set the temperature controller to the desired baking
temperature.
NOTE: For complete temperature controller operation
instructions refer to Step C.
5. Turn the HEAT switch (Figure 3-6) to the “ON” or “I”
position. Wait for the “Heat ON” light to turn on.
6. Oven will reach a baking temperature of 500°F (232°C)
in approximately 20 minutes. Allow the oven to cycle for
30 minutes after it has reached desired bake temperature.
The oven is now ready for baking.
Power Failure
In case of power failure, turn off all switches and remove
product. After power has been reestablished follow
normal startup procedure.
B. Shutdown Procedure
1. Turn the BLOWER and HEAT switches to “OFF” or “O”.
NOTE: The blowers will remain on until the oven tempera-
ture cools down to 200°F (93°C) at which time they will stop
automatically.
2. Make certain that there are no products left on the
conveyor inside the oven. Turn the CONVEYOR switch
to “OFF” or “O”.