


4
Electrical requirements
Check that the voltage on the rating plate of your
appliance corresponds with your house electricity
supply which must be A.C. (Alternating Current).
If the socket outlets in your home are not suitable
for the plug supplied with this appliance, the plug
should be removed and the appropriate one fitted.
Note: The plug removed from the mains lead, if
severed, must be destroyed as a plug with bared
flexible cord is hazardous if engaged into a live socket
outlet.
WARNING: THIS APPLIANCE MUST BE EARTHED.
Should the fuse in the 13 amp plug require
changing a 13 amp BS1362 fuse must be fitted.
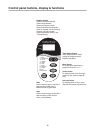
About this breadmaker
About the recipes
• It has two settings to make a small 680g (1.5lb) or
large 909g (2lb) loaf (approx weight - depends on
recipe).
• Fruit and nut dispenser automatically dispenses the
fruit, nut, olives etc. into the dough at the correct
time ensuring these ingredients are evenly
distributed.
The recipes in this booklet have been thoroughly
tested to ensure best results. Recipes have been
created by home economists specifically for this
machine and may not produce acceptable results in
other similar machines.
• Always add ingredients in the order they are listed
in the recipe.
• Accurate measuring of ingredients is vital. Do
not use larger amounts. Use the measuring cup
and spoons provided.
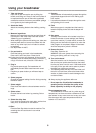
Introduction
The smell of homemade bread wafting around the
home is one of those great smells. Bread, fresh out of
the oven, with melting butter is a memorable taste
sensation. The Morphy Richards automatic
breadmaker can create that experience every morning.
There's very little effort on the part of the baker,
because the breadmaker is a sophisticated appliance
with a computer memory that does all the work for you.
It’s as simple as one-two-three.
1 Put in the ingredients.
2 Select program from the menus and press start.
3 Wait for your bread.
But don't stop at baking bread in this appliance.
Besides being able to do all kinds of speciality breads,
including wholewheat, you can also prepare doughs
for bread rolls, pizza, cake and jam. Everything is easy
and tastes homemade - because it is.
Before first use, please take a few minutes to read
this instruction book and to find a place to keep it
handy for reference. Pay particular attention to the
safety instructions.
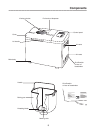
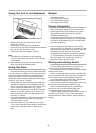
1 Carefully unpack the breadmaker and remove all
packaging materials.
2 Remove any dust that may have accumulated
during packing.
3 Wipe the baking pan, kneading blade and outside
surface of the breadmaker with a clean, damp cloth.
The bread pan is non-stick coated. Do not use
scouring pads or any abrasives on any part of the
breadmaker.
4 For first time use oil, butter or margerine to grease
the bread pan and bake empty for about 10
minutes (select the Extrabake program).
5 Allow to cool and clean once more.
6 Place the kneading blade on the axle in the baking
pan.
In manufacture it is necessary to lightly grease
some parts of the appliance. This may result in the
unit emitting some vapour when first used, this is
normal.
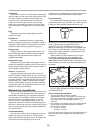
7 This breadmaker is fitted with mains switch at the
rear of the machine, it can be left permanently
switched on ready for use.
The breadmaker programme is started by the start-
stop button on the control panel.
If when you plug in the breadmaker and switch on
at the mains there is no display, make sure the
on/off switch at the rear of the breadmaker is
switched to the ‘I’ ON position.
Before first use