


Table Of Contents
Page #
Important Safeguards
...........................................................................................................
2
Cord Set Instructions
............................................................................................................
2
Installation
.....................................................................................................................
.3-5
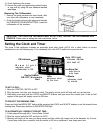
Setting the Clock and Timer
.................................................................................................
.5-6
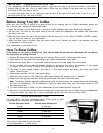
Before Using
.....................................................................................................................
.6
Brewing Coffee
..................................................................................................................
.6
Automatic Shut Off
...............................
...........................................................................
.7
Cleaning Is A Must
...............................................................................................................
7
Decanter Cleaning
..............................................................................................................
.7
Precautions
......................................................................................................................
.8
Helpful Hints
.....................................................................................................................
.8
If Service Is Required
...........................................................................................................
.8
Limited Warranty
.................................................................................................................
8
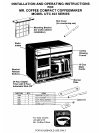
Installation Instructions
Introduction
This coffeemaker has been designed for either countertop or installation beneath a suitable cabinet.
COUNTERTOP USE
If you elect to use the coffeemaker as a countertop model, locate the slot covers found’in the
hardware bag. Snap the covers into the slots atop the coffeemaker on the left and right hand
sides.
Rotate the vent knob in the rear of coffeemaker so that the arrow points up (vent closed).
The coffeemaker is ready for use. Do not restrict the airflow under the coffeemaker by placing
a cloth beneath it.
Custom Installation
If you elect to install the coffeemaker beneath a wood or metal cabinet then follow these steps.
Where To Locate The Coffeemaker
1.
Remove the brew funnel and glass decanter from the coffeemaker.
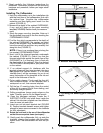
2. Hold the coffeemaker at various sites around the kitchen. Select a site which meets these requirements:
!
The cabinet itself must be level
and
properly installed. It must be at least 10 inches deep, 15% inches above
the countertop, and have at least 1% inches clearance on each side of the coffeemaker (for bracket mouting
and ventilation).
!
An electrical outlet must be within reach of a properly draped power cord.
The site must not be one over which you intend to operate another cooking or heat producing appliance,
or is above a sink or stove or in front of undercabinet lighting.
Proceed when you have selected a suitable site.
.
Preparation For Installation
1. Clear off the countertop area below and adjacent to the chosen
installation
site. You will want plenty of free
work room.
2. If necessary, clean the underside of the cabinet to remove any oily film.
3. Remove all cabinet contents above and adjacent to the site (you will be drilling through the cabinet bottom).
Move contents away from the site. --
-- -- ---
4. Collect the following needed tools:
Safety Glasses
Drill and inch Drill Bit
Scissors
Center Punch or Nail
Tape Measure or Ruler
Pencil
Sandpaper
Tape
Flat Blade Screwdriver
Metal File
3