


3312
Sistema de Filtración de Agua (
no incluido con el FTS12/ FTS13
)
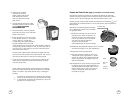
¡Felicitaciones! Usted es el dueño de un sistema de filtración de agua MR.
COFFEE
®
. Este filtro de agua a base de carbono mejora el sabor de su café al
remover el 97% del cloro del agua que usted utiliza para colar su café.
Primero busque el símbolo MR. COFFEE
®
de Afinidad con la Filtración en la
parte inferior de la canasta del filtro. Si no ve este símbolo, favor de llamar al 1-
800-672-6333.
Para utilizar el sistema de filtración de agua
en su Cafetera MR. COFFEE
®
, favor de seguir
los siguientes pasos:
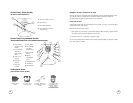
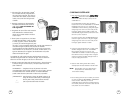
1. Utilizando el indicador rojo en el filtro de
agua del marco, alinee el indicador con
la letra en el marco que corresponde al
mes en que utiliza el disco por primera
vez. Esto sirve para recordarle de
cambiar el disco cada mes
(aproximadamente 30 ciclos de colado).
ADVERTENCIA: Para resultados idóneos, utilice el sistema
de filtración de agua con un filtro permanente.
2. Enague bien el filtro de agua fresca.
3. Luego decompletar los pasos en la seccion
“Anadyendo Agua y Cafe Molido” y cuando
termine de colar el café, enjuague el filtro de
agua con agua fresca. No ponga su filtro de
agua en el lavaplatos.
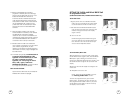
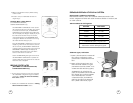
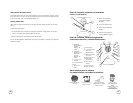
Para reemplazar los discos de filtro de agua: tuerza
la cubierta gris del disco hasta retirarla de su
sistema de filtración de agua. Saque el disco
usado. Inserte el disco nuevo en el marco y
tuerza la cubierta de nuevo hasta que se
acomode en su lugar.
Indicador Rojo
Marco
Disco de
Filtro
Cubierta
del Disco
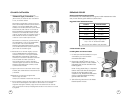
3A. Place the MR. COFFEE
®
water filter in the filter
basket, making sure that the
side marked “this side up”
faces you and that the water
filter is level.
4. Add the desired amount of coffee
and gently shake to level the coffee.
See the Suggested Coffee
Measurement Chart.
5. Be sure the filter is properly centered
and all the way down in the outer filter
basket. Close the lid.
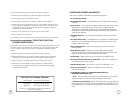
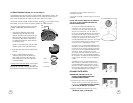
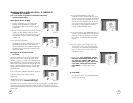
6. Fill the decanter with cold, fresh water
to the desired capacity (1 cup equals 5
ounces) (Figure 6). For easy and
accurate filling, the water markings on
the glass decanter and on the dual
water windows show the amount of water needed to make the
corresponding desired number of cups. Do not fill past the “12
cup MAX line” or water will flow out of the overfill hole in the
back of the water reservoir.
The amount of coffee brewed will always be slightly less than
the amount of water poured in the water reservoir. This is due to
the minimum absorption of water by the coffee grounds.
7. Lift the pour through reservoir lid and pour the water into the
water reservoir. Close the lid and place the empty decanter
onto the warmer plate.
NOTE: Make sure the decanter is fully placed on the warming
plate or the water and the grounds will overflow from the filter
basket. An overflow may cause personal injury or damage to
property.
CAUTION! To reduce the risk of damaging the decanter
and/or the risk of personal injury, do not add cold water
to the decanter if the decanter is already hot. Allow the
decanter to cool before using.
Figure 6