


SERVICE INSTRUCTIONS
B. CLEANING THE SPRAYHEAD
Over time mineral build up may develop around the
(6) spray holes on the spray head which may lead to
pot volume variances. Periodic inspection and
cleaning of the spray head is recommended.
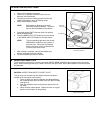
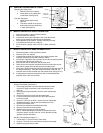
1. Turn spray head counter clockwise a quarter
turn until it stops (see figure 6).
2. The spray head and the brew basket rail will
drop straight down to remove.
3. Remove gasket from spray head when cleaning.
4. Reassemble spray head and brew basket rail
using reverse procedure. Make sure spray
head detents (clicks) into place when
reassembling.
Figure 6
Spray head removal Illustration
Brew Basket Rails
Spray Head Gasket
Spray Head
Figure 5
Thermostat Adjustment Illustration
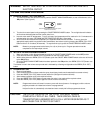
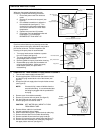
A. ADJUSTING HOT TANK THERMOSTAT
Whenever thermostat adjustment becomes
necessary, complete the following procedure:
1. Disconnect power cord from electrical
outlet.
2. Remove (2) screws and rear panel (see
figure 5).
3. Use a bladed screwdriver to adjust the
thermostat knob (see figure 5). Turn
clockwise for hotter water temperature
and counter clockwise for cooler water
temperature.
4. Replace rear panel and (2) screws.
5. Plug power cord into electrical outlet and
follow steps 1-3 in ENERGIZE
BREWER/HOT TANK HEAT UP
Thermostat
Adjustment Knob
Rear Panel
On/Off main
power switch
IEC Cord
Receptacle
3/8” Quick Tube
Connect
Rear Switch Plate
Screws (2)
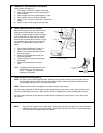
C. REMOVING HOT TANK ASSEMBLY FROM CABINET ASSEMBLY
1. Turn the main water supply to brewer OFF.
2. Disconnect the power cord from both the electrical outlet
and the IEC plug located at the rear of the brewer (see
figure 5).
3. Disconnect 3/8 inch supply tube from quick tube connect
(see Figure 5).
NOTE: If hot tank is full, water will dribble from the
external tube fitting. It is recommended that
the fitting be plugged with the provided 3/8
inch plug.
4. Remove cover from cabinet assembly.
5. Remove (2) screws and rear panel (see figure 5).
6. Pull drain tube out rear access opening.
7. Remove plug from end of drain tube.
CAUTION: HOT WATER WILL IMIDIATLY FLOW
FROM DRAIN TUBE.
8. Remove ribbon cable for circuit board.
9. Let tank completely drain of water.
10. When finished draining tank, replace the drain tube plug.
11. Remove silicone tube from hot water faucet fitting.
12. Remove molded silicone tube from spray head top.
13. Remove (2) screws from rear switch plate (see figure 5).
14. Remove hot tank assembly from cabinet by lifting from
the upper plastic reservoir (see figure 7).
Hot Water
Faucet Outlet
Opening
Figure 5
Thermostat Adjustment Illustration
Figure 7
Hot Tank / Cabinet Assembly
Cabinet
Assembly
Hot Tank
Assembly
Cove
r