


5
perlick.com
PERLICK RESIDENTIAL INSTALLATION MANUAL
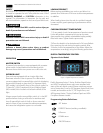
To Set Target Temperature
Press and release the SET button. Display will show the
current temperature setpoint.
To Change Setpoint Temperature
1. Press and hold the SET button until the display shows
the current setpoint temperature with the “F” ashing.
2. Use the UP and DOWN arrow button to scroll to the
desired temperature.
Signature Series Dual-Zone Control Instructions
Upper Compartment:
To view the upper compartment temperature, press and
release the DEFROST button (melting snowake).
Lower Compartment (Must be coldest zone):
Display reading always shows the lower compartment
temperature.
Setpoint Display:
Press and release the SET button; display will read St1.
Press SET again and the LOWER compartment setpoint
will be displayed.
Press SET again; the display will read St2. Press SET
again and the UPPER compartment temperature will be
displayed.
Changing the Lower Compartment Temperature:
1. Press and hold the SET button until the display shows
St1 with”F” ashing.
2. Press SET again to display the upper compartment’s
current temperature (“F” will continue to ash).
3. Use the UP or DOWN arrow key to scroll to the desired
temperature. The controller will memorize the new
temperature.
Changing the Upper Compartment Temperature:
1. Press and hold the SET button until the display shows
St1 with”F” ashing. Press the DOWN arrow once; the
display will read St2,
2. Press SET again to display the upper compartment’s
current temperature (“F” will continue to ash).
3. Use the UP or DOWN arrow key to scroll to the desired
temperature. The controller will memorize the new
temperature.
NOTE: Dependent on the model and conguration, the controllers
have been programmed to only allow a temperature adjustment
within a specied range. See the chart below for the specied range
allowed for your unit.
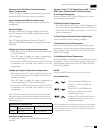
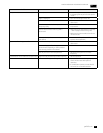
Signature Series – Dual-Zone Units
Model Factory Temperature
Setpoint Lower/Upper
Range (F)
HP24D 51°F / 62°F 40° - 68° / 40° - 68°
Signature Series 15”, 24” Single-Zone, and 48” , C-Series,
ADA Freezer, Shallow-Depth Control Instructions
Dual-Zone Temperature Scale
To change F to C, press and hold the down arrow for 3
seconds.
To Start A Manual Defrost (Freezer Models Only)
Press the DEFROST button (melting sowake)
To Set Maximum Stored Temperature
Press the UP arrow button to see the maximum stored
temperature. To reset the maximum stored temperature,
while displayed, press and hold the SET button until ‘rst’
ashes in the display.
To Set Minimum Stored Temperature
Press the DOWN arrow button to see the minimum stored
temperature. To reset the minimum stored temperature,
while displayed, press and hold the SET button until ‘rst’
ashes in the display.
On/O
Press the ON/OFF button to turn the unit on or o.
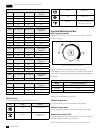
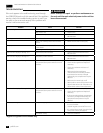
Key Combinations:
+
Press the UP and DOWN arrow
buttons to lock and unlock the
keyboard
+
Press the SET and DOWN arrow
buttons simultaneously to enter
programming mode.
+
Press the SET and UP arrow buttons
simultaneously to return to room
temperature display.
NOTE: Dependent on the model and conguration, the controllers
have been programmed to only allow a temperature adjustment
within a specied range. See the chart on page 6 for the specied
range allowed for your unit.