1-3
d. When all four legs are mounted, stand the unit up being careful not to put too much weight
on any one leg. Adjust the height and level the fryer by adjusting the leveling devices on
the leg with the water pump pliers.
1.3.2 Heat Deflector Installation
If the fryer requires a heat deflector, you will find a removable label at the rear top edge of the unit.
This label has instructions for positioning and installation of the heat deflector. Refer to the label and
the instructions below to install the deflector.
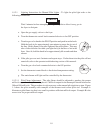
a. Remove the two self-drilling screws from the top, back area of the cooker.
b. Position the heat deflector so that the angled portion of the deflector is facing toward the
front of the fryer. Secure the heat deflector to the back of the unit using the sheet metal
screws previously removed.
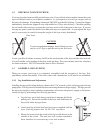
WARNING
DO NOT obstruct the flow of combustion/ventilation or air openings around
the fryer. Adequate clearance around the fryer is necessary for servicing and
proper burner operation. Ensure that you meet the minimum clearances
specified in the installation instructions.
c. When properly installed the angled section of the heat deflector will extend over the flue
opening to redirect the heat. It SHOULD NOT cover the flue opening. Nothing should
block the flue opening as this will cause the fryer to overheat and produce dangerous
gases.
1.3.3 Splashback Installation
a. Lift the splashback assembly and place over the opening at the back of the tank. Make
sure the front of the splashback faces forward.
b. Using the four supplied countersink screws, attach the splashback to the cabinet sides.
1.3.4 Flue Installation
Insert the flue through the hole in the top of the splashback. Make sure it rests on the flue opening
at the back of the tank.
1.3.5 Drainboard Installation
While the drainboard is being held in place, slide the pivot rod through the holes in the bottom end
of the drainboard. The end of the rod should locate in the hole in the backsplash. The front end is
attached to the top of the tank using a bolt and washer.


