


4
To order a replacement Control Master
®
heat
control, see Service Information on page 20.
To assure the continued accuracy of the Control
Master
®
heat control, avoid rough handling
during use and storage. Store the cord assembly
in a clean, dry location away from metal objects.
Always check the magnetic coupler end before
use to assure metal items have not become
attached.
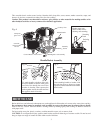
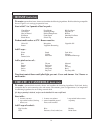
Probe
Pilot light
Heat selector
Control Master
®
heat control
Magnetic cord
assembly
Heat
control
Magnetic
coupler end
Fig. D
Electrical
pins
*Scotch-Brite is a trademark of 3M.
**Dobie is a trademark of Pechney Plastic Packaging, Inc.
†dip-it is a registered trademark of Ecolab, Inc.
1. Prepare food for cooking according to recipe (see pages 6 to 19).
2. Place multi-cooker on a dry, level, heat resistant surface.
3. Insert the probe end of the heat control into the multi-cooker so the two electrical pins on the appliance are fully
inserted into the heat control. Then attach the magnetic cord assembly to the heat control by aligning the magnetic
coupler end with the two electrical pins located on the back
of the heat control (Fig. D). Due to the fact that the magnetic
coupler end is polarized, it can only be attached to the heat
control one way. When properly aligned, the plug will mag
-
netically attach itself to the heat control. If positioned upside
down, it will not attach.
Important: The magnetic cord was designed to detach
easily from the multi-cooker. As a result, if it is bumped or
touched during use, it could possibly detach causing the
unit to stop heating. Avoid contact with cord during opera
-
tion. If contact occurs, verify that the cord is still properly
connected.
4. Plug the multi-cooker into a 120v AC electrical polarized outlet
only.
5. Set the heat control at the temperature specified in the recipe.
The pilot light will go out when selected temperature is reached.
During cooking, the pilot light will go on and off indicating
temperature is being maintained.
6. Instructions for slow cooking are on page 5.
7. Simmer: To find the simmer point (just below boiling), heat
multi-cooker at 400˚ until the food boils then turn the control
down until the light goes out. If you don’t want food to boil,
start at warm and increase heat until you reach the simmer
point.
8. When cooking is complete, turn heat selector to OFF. Remove plug from wall outlet and then remove magnetic
coupler end from heat control. Allow appliance to cool and detach heat control from multi-cooker before clean
-
ing.
CARE AND CLEANING
Wash appliance in dishwasher or in warm, sudsy water, rinse, and dry. Do not immerse heat control or magnetic
cord assembly in water or let them come in contact with any liquid. Crockery liner should be allowed to cool
before cleaning.
After each use, clean the nonstick base and crockery liner with a non-metal cleaning pad, such as Scotch-Brite* Multi-
Purpose Scrub Sponge or Scotch-Brite* Dobie** Cleaning Pad. Firm pressure can be applied, if necessary. Do not use
steel wool or abrasive kitchen cleaners.
In time, the nonstick finish may darken over the heating element. To remove this discoloration, use a commercial
cleaner designed for cleaning surfaces, such as dip-it
†
destainer. These cleaners are available at most grocery and hard-
ware stores. For best results, follow the manufacturer’s instructions, being careful that any cleaning solution coming
in contact with the exterior of the appliance is wiped off. After treating the appliance with a commercial cleaner, it is
recommended that the cooking surface be wiped lightly with a cooking oil before using.
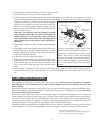
Periodically check the screws on the two handles and four legs for looseness. Retighten, if necessary, with a standard
slotted screwdriver. CAUTION: Overtightening can result in stripping of screws or cracking of handles and legs.