


7
CaRe and MainTenanCe
1. The outside surface may be kept bright and shiny by cleaning with a good silver polish or simply by washing with soap and
water. Iron and various minerals in water and foods may darken the inside of the canner but this discoloration will in no way
affect food cooked. These stains may be removed by using a solution of water and cream of tartar. For each quart of water,
use one tablespoon cream of tartar. Pour enough solution into the canner to cover the discoloration (do not fill over
2
⁄
3
full),
then close cover securely. Place regulator on vent pipe and heat until 15 pounds pressure is reached. Remove canner from
heat; allow canner to stand two to three hours. Remove regulator, open canner, and empty contents. Scour thoroughly with a
soap impregnated steel wool cleaning pad; wash, rinse, and dry.
Due to the acidic nature of the water supply in some areas, deterioration of the interior surface of the canner body may occur.
To minimize this effect, thoroughly scour the inside of the canner body with an abrasive cleanser at least once a year.
2. Each time the canner is washed, remove the sealing ring and wash in warm, sudsy water, rinse, dry, and replace in cover.
3. The air vent/cover lock may be removed for occasional cleaning or for replacing the small gasket (see page 4). Wash all parts
in warm, sudsy water. Use a soft cloth or small nylon brush to clean the cover hole. The small gasket must be in place when
reassembling the air vent/cover lock.
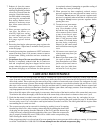
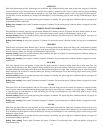
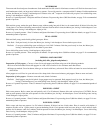
4. The overpressure plug can be removed for cleaning by pushing it out of its opening
from the top of the cover. After cleaning, reinsert the plug by pushing the domed side
of the plug into the opening from the underside of the cover, until the bottom edge
is fully and evenly seated against the underside of the cover. When the overpressure
plug is properly installed, the word (TOP) will be visible on the overpressure plug
when viewing the outside of the cover.
If the overpressure plug is ever forced out of its cover opening due to excess pressure while cooking or canning, it is important
to call the Test Kitchen at 1-800-368-2194. Do not attempt to use the released overpressure plug.
is completely reduced. Attempting to speed the cooling of
the canner may cause jar breakage.
12. When pressure has been completely reduced, remove
pressure regulator from vent pipe and let canner cool for
10 minutes. Do not remove the pressure regulator until
pressure is completely reduced and the air vent/cover lock
has dropped. Always remove pressure regulator before
opening the cover.
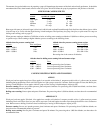
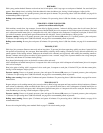
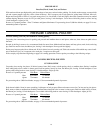
13. To remove cover, turn counter-
clockwise until cover hits
stop. Cover handles will be
beyond the body handles. If
cover seems to stick or is hard
to turn, do not force it open.
Sticking may indicate that
there is still pressure inside
the canner. If in doubt about
pressure being completely
reduced, let the canner stand
until cool before removing the
cover.
14. Lift canner cover toward you
to keep steam away from you
when opening.
15. Remove jars from canner. Set
jars apart on board or cloth
away from draft to cool. When
jars are cold, test seal, remove
bands, wipe jars, label, date,
and store in a cool, dry place.
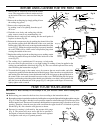
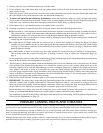
7. Exhaust air from the canner
and jars by adjusting heat to a
relatively high setting to obtain
a free flow of steam from the
vent pipe. Consult the instruc-
tion book which accompanied
your range for recommended
heat setting. Reduce heat to
maintain a moderate steam
flow. Allow steam to flow for
10 minutes.
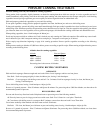
8. Place pressure regulator on
vent pipe. Set burner at a
relatively high heat setting,
on most range burners, and
heat canner until pressure
dial gauge registers desired
pressure.
9. Processing time begins when pressure gauge registers the
correct pressure. Adjust heat to maintain correct pressure
on the dial gauge.
10. At end of processing time, turn burner to “OFF” and remove
canner from heat source. Lift pressure canner to remove
it from burner. Sliding cookware can leave scratches on
stovetops.
11. Let pressure drop of its own accord, do not quick-cool.
Pressure is completely reduced when the air vent/cover
lock and overpressure plug have dropped and no steam
escapes when the pressure regulator is tilted. Do not use
the pressure dial gauge as an indicator for when pressure
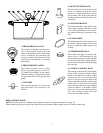
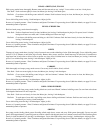
Cover
Overpressure
Plug
Indented Portion
Top