


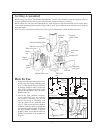
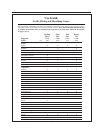

Getting Acquainted
Before using your Presto
Professional SaladShooter
electric slicer-shredder, study the diagram below to
become familiar with the various parts of the unit and read the instructions carefully.
Before initial use, and after each subsequent use, wash all parts except the motorized base in warm, sudsy
water. Wipe the motorized base with a damp cloth to clean. Never immerse the motorized base in water or
any other liquid.
Note: For your convenience, the thin slice cone is grey to differentiate it from the thick slice cone.
Slicing-shredding chute
Food
chamber
Fingertip
power switch
Interlock
bracket
Medium shred cone
Twist-lock
ring
Funnel
guide
Thick slice cone
Motorized
base
Bracket slot
Ripple
cut cone
Driving
end
Adjustable
food guide
Lock tab
Thin slice cone (grey)
Fig. A
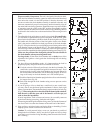
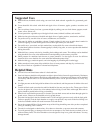
Slicing-
shredding chute
Food
chamber
assembly
Fig. B
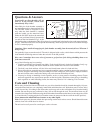
Food
chamber
assembly
Twist-
lock ring
Fig. C
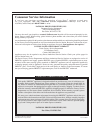
Bracket
slot
Socket
Driving
end
Interlock
bracket
Bracket
slot
Fig. D
3
How To Use
1. Select one of the cones and insert it narrow
end rst, into the slicing-shredding chute
(Fig. A). Then attach the twist-lock ring
by turning clockwise until it locks into
place (Fig. B). The metal portions of the
slicing and shredding cones are sharp.
Handle with care.
2. Attach the food chamber assembly
to the motorized base by inserting
the portion containing the driving
end of the slicing or shredding cone
into the socket of the motorized base
(Fig. C). Then rotate the food chamber
assembly clockwise until it is upright and
it is centered with the handle. To be sure
the food chamber assembly is attached
properly, check to see that the interlock
bracket is positioned in the bracket slot
(Fig. D).