


4
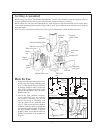
Fig. F
Fig. E
Lock
tab
Fig. G
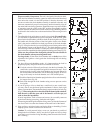
Fig. H
Stack food horizontally
for longer slices.
Stack food upright for
short slices.
Fig. I
Proper assembly is important. The unit is designed with safety in mind.
Thus, the food chamber assembly cannot be removed from the motorized
base unless the switch is in the OFF position. Likewise, the motor will
not turn on unless the food chamber assembly is attached to the unit, and
the motor automatically stops if an incorrectly attached assembly slips off
the motorized base during operation. Should the motor stop in the middle
of operation, turn the switch to the OFF position. Reassemble, making
sure the interlock bracket on the bottom of the slicing-shredding chute is
positioned in the bracket slot on the motorized base before using the unit
again.
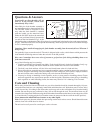
3. The adjustable food guide adapts to small or large loads. For small loads,
you will need to separate the two-piece food guide. With the food guide
placed in the food chamber, pull the lock tab on the food guide away from
the handle and slide the portion of the food guide closest to the handle
(this is the portion without the lock tab) up and out of the food chamber
(Fig. E). Now place the food you would like processed in the portion of the
food chamber closest to the handle (Fig. F). The food should not extend
above the top of the food chamber. Use the part of the food guide that you
removed earlier to push the food through the unit during processing (Fig. G).
Make sure the portion of the food guide with the lock tab remains in
the food chamber when processing small loads.
For large loads, ll the entire food chamber and use both pieces of the
adjustable food guide to slowly push the food through the unit during
processing.
4. For best slicing and shredding results, it is important that the food be
prepared properly and placed in the food chamber as follows:
Cut food so that it will t easily and loosely into the food chamber. For
small loads, use the adjustable food guide as instructed in step 3. Food
that does not t loosely in the food chamber may become wedged in
the food chamber and therefore will not discharge properly. If it is too
large to t loosely in the food chamber, cut it into smaller pieces.
Stack food into the food chamber upright for short slices or horizontally
for longer slices (Fig. H).
Push food through the food chamber using an even pressure on the
food guide.
5. If you are going to slice or shred into a small bowl or onto a small area,
you may want to use the funnel guide attachment. It directs foods right
where you want them. The attachment simply snaps onto the twist-lock ring
(Fig. I). When using the slicer-shredder with the funnel guide attached,
hold the unit so that the open end of the funnel is over the spot you
wish to shoot the ingredients.
If moist ingredients, such as lettuce and carrots, do not readily come out
of the funnel during processing, shake the unit slightly.
When using the funnel guide with the slicing cones, be sure the diameter of
the sliced food is less than the diameter of the small end of the funnel.
6. Plug cord into a polarized outlet, and begin slicing or shredding. Use the
ngertip power switch to turn the unit on and off.
Caution: To avoid personal injury, never use your hands to push food
through the food chamber. Always use the food guide and always keep
your hands away from the slicing-shredding chute when the slicer-shred-
der is running.