


EN
7
7
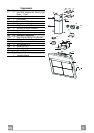
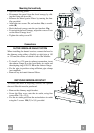
Mounting the hood body
• Open the ducting panels.
• Disconnect the panel from the hood canopy by slid-
ing the fixing pin lever.(A)
• Remove the metal grease filters by turning the han-
dles provided.
• Adjust the two screws Vr, on brackets 11a, to a mini-
mum.(B)
• Hook the hood canopy onto the two brackets 11a.
• From inside the hood canopy, adjust the screws Vr to
set the Hood Canopy level.
• Tighten the safety screw 11.
(A)
(B)
Vr
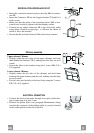
Connections
DUCTED VERSION AIR EXHAUST SYSTEM
When installing the ducted version, connect the hood to
the chimney using either a flexible or rigid pipe ø 150
or 125 mm, the choice of which is left to the installer.
• To install a ø 125 mm air exhaust connection, insert
the reducer flange 9 on the hood body air outlet and
the adapting ring ø120-125 10 on the reducer flange.
• Fix the pipe in position using sufficient pipe clamps
(not supplied).
• Remove any activated charcoal filters.
9
ø 125
10
ø 150
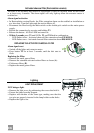
RECYCLING VERSION AIR OUTLET
To install the hood in recycling version, the optional
charcoal filter kit must be purchased.
• Remove the chimney angle bracket.
• Screw the filter cover onto the air outlet, using four
screws 12c (2.9 x 12.5).
• Fix the air outlet grid 8 on the recirculation air outlet
using the 2 screws 12d (2,9 x 9,5) provided.
16
12c
12d
8