


any carbon dust that formed as a result of shipping. It will also remove any
air bubbles present in the carbon. Failure to complete this step may result in
water not flowing through the mineral dispenser. If carbon dust appears in
your reservoir after your first cycle, discard
(water is safe to use for plant watering).
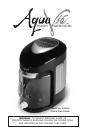
Your AquaVié
™
Healthy Water System unit is now ready for use.
NOTE: For healthier, great tasting water, replace your mineral dispenser
after producing 20 gallons of AquaVié
™
water —about once a month for
the average family.
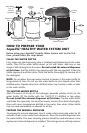
INSTRUCTIONS FOR PRODUCING AquaVié
™
WATER
1. Place your AquaVié
™
unit on a dry, level surface in a well ventilated
area.Plug the cord into a properly grounded rated voltage AC electrical
outlet ONLY.
NOTE: Be sure to place the AquaVié
™
unit in a location that provides adequate
ventilation during operation, with at least 4 inches (10 cm) of clearance to the
sides and back, and 3 inches (8 cm) to the top of the unit. Do not operate the
AquaVié
™
unit in an enclosed area such as a cupboard or cabinet. The unit must
be operated in air temperatures of 40˚F-110˚F (5˚C-45˚C).
2. Remove the boiling chamber from the unit by grasping its handle and
pulling it straight out of the AquaVié
™
chassis. Do not lift up when
pulling the boiling chamber out of the chassis.
CAUTION: To prevent personal injury, burn and/or scald injury, do not
remove the boiling chamber until it has cooled completely.
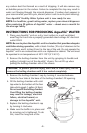
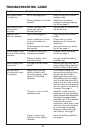
3. Remove the boiling chamber’s cap by turning it counterclockwise.
Note the four tabs at the base of the boiling chamber’s fill opening.
4. Fill the boiling chamber with cold
tap water to the bottom of the four
tabs which equals 1 gallon (4 liters).
Do not overfill the boiling chamber.
Over-filling the boiling chamber
may result in leakage, electrical
failure, electrical hazard, or
damage to the AquaVié
™
unit.
5. Replace the boiling chamber’s cap
by tur
ning it clockwise.
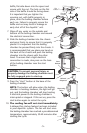
6. Make sure the baffle is in place and
its securing nut is tightened. To do
this, insert the long end of the
T
abs
Water
Fill
Level
Start
Button
Boiling
Chamber Cap
-4-
Baffle