


English
18
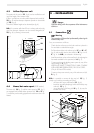
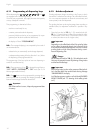
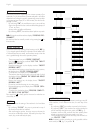
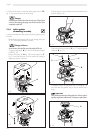
fig. 11
A
1
2
3
4
5
B
15
7 - MAINTENANCE
7.1 Foreword
Danger
Before any servicing and/or cleaning, disconnect the ma-
chine by way of main switch (ref. 10, fig. 1) and multi-pole
switch (or disconnect the plug) and await machine cooling.
- The components that cannot be dismantled and the machine
itself, have to be cleaned, unless differently specified, with
cold or lukewarm water only, using non abrasive sponges and
damp cloths.
- Do not use direct water sprays.
- All parts to be cleaned are easily accessible and do not re-
quire the use of tools.
- Regular maintenance and cleaning will preserve the machine
and maintain its efficiency for a longer period as well as con-
forming to health and hygiene norms.
- The machine automatically signals when the maintenance and/
or descaling interventions are due; the exact number of dis-
pensing instances is visible by the mechanical counter or on
the machine display. No intervention of the Maintenance tech-
nician may result in machine locking.
Danger
In case of operation troubles, normally signalled on display,
immediately switch the machine off, disconnect the power
through a multi-pole switch or by disconnecting the plug and
contact the nearest SERVICE CENTRE.
7.2 Cleaning of machine
Danger
Never clean the machine when it is in “
STANDBY”
status.
Cleaning must be carried out daily and before any long dead
time, in order to avoid the formation of deposits in containers,
trays and dispensers.
All removable machine components that have to be cleaned can
be washed and rinsed in running water.
Clean machine covers, panels and commands with soft and dry
cloths, or slightly dampened by cold or lukewarm water.
Important
Never wash machine components in the dishwasher.
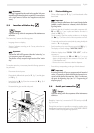
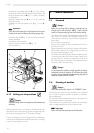
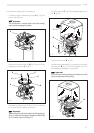
- Assemble the cup heating plate (ref. 4, fig. 11) by inserting
the electrical connector into the electronic board properly, the
fitting into the drain tube (ref. B, fig. 11), and by connecting
the earth cable.
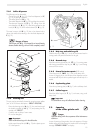
- Manually rotate the studs (ref. A, fig. 11) so as to place the
milling horizontally.
- Assemble one of the side panels (or ref. 1, fig. 11 or ref. 5,
fig. 11).
Important
Firstly slide in the bottom pins in their frame slots, then press
directly on the studs until hearing the locking springs snap.
- Position the glass (ref. 2, fig. 11) in the slot of the lateral panel
already assembled.
- Assemble the other side panel.
- Insert the drip tray into place (ref. 15, fig. 11).
- Switch machine on.
6.17 Setting out of operatione
Danger
Operation falling within the competence of the Maintenance
technician.
When the machine is put out of operation, disconnect both water
and electrical mains; empty all trays, boilers and pipes and clean
the whole machine properly (see “7.2 Machine cleaning”).
In case of scrapping, the various materials used in manufacturing
will have to be separated and individually disposed of, according
to each Country regulations in force.