


Operating Instructions
1. Place the assembLed Deep Fryer on the table or counter,
approximately 2 feet from a standard 120V AC electrical outlet.
Do not let the cord hang over the edge of table or counter.
2. Remove the Lid and Fryer Basket and set aside.
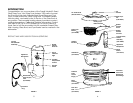
3. Make sure the Glass Bowl is properly seated on the 3 rubber
stops inside the Cool Touch Guard.
4. The Control Panel/Heat Assembly must be correctly fitted into
the Main Housing.
5. Pour liquid cooking oil (corn,vegetable,peanut, etc.) into the
Glass Bowl. Fill with oil to a level between the MIN (6 cup) and
MAX. (8 cup) markings.
WARNING: DO NOT under-fill or over-fill the Glass Bowl.
NOTE: NEVER MIX 2 DIFFERENT TYPES OF OIL AND/OR FAT.
6. Replace the Fryer Basket into the Glass Bowl, locking the
Handle into position.
7. Replace the Lid. Make sure the ON/OFF Switch is in the OFF (O)
position, the Variable Temperature Dial is turned to MIN.
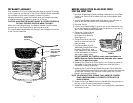
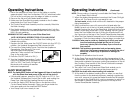
8. Connect the Detachable Power Cord into the Appliance
Receptacle. (See Figure 5.) The cord
will fit securely when properly
attached. Then connect the Polarized
Plug to the wall outlet.
9 Press the ON/OFF Switch to ON (I).
10. Turn the Variable Temperature Control
Dial to the desired frying temperature:
265ºF to 375ºF. The Power ON Light will
illuminate until cooking oil reaches
indicated temperature.
SAFETY RESET BUTTON
NOTE: The Safety RESET feature will be triggered if there is insufficient
oil in the Glass Bowl and power to the unit will be shut off.
• If this should happen, press the ON/OFF Switch to OFF (I). Turn
the Variable Temperature Control Dial to MIN. and unplug the
Deep Fryer. Wait until the Heating Element cools down.
• Locate the Safety RESET Button hole on the bottom of the
Control Panel/Heater Assembly. Place your finger inside the
hole area and push the small red RESET Button.
• Your Deep Fryer is now ready to use.
9
NOTE: Oil may make a “popping” sound inside the Deep Fryer as
the oil heats.This is normal.
11. When the desired temperature is reached, the Power ON Light
will turn off. The Deep Fryer is now ready for use.
For best results, always wait until the oil is heated to the proper
frying temperature.
12. Using a protective oven mitt, remove the Lid and raise the
Basket up and out of the hot oil and carefully hang the Basket
Handle Hook on the rim of the Glass Bowl. Add food to the Fryer
Basket, never filling more than 1/2 full. Wearing the mitt, gently
lower the Fryer Basket into the oil, fitting the Handle back into
the 2 grooves on the top of the Control Panel/Heater Assembly.
13. When the Fryer Basket is lowered into hot oil, all food should be
immersed. Cook food according to the package or recipe time.
CAUTION: Take care to avoid any spattering oil which may result
from the food being placed into the hot oil. Do not
touch any interior part of the Deep Fryer or the oil as
they are hot!
WARNING: This appliance generates heat and escaping steam
during use. Use proper precautions to prevent the risk of
burns, fire, or other injury to persons or damage to
property.
14. Replace Lid and allow food to cook.
15. As the Deep Fryer cooks the food and the temperature of the
oil decreases, the Power ON Indicator Light will illuminate as the
thermostat maintains the proper cooking temperature of the oil.
See Cooking Chart section in this Owner’s Manual for sample
cooking times and temperatures.
16. The clear Cool Touch Guard and Glass Bowl enable you to
watch the progress of the foods as they brown and fry.
CAUTION: Use oven mitts when handling hot materials.
17. At the end of the desired cooking time or when you see that
food is cooked to the desired doneness, wearing a protective
oven mitt, remove Lid, grasp the Basket Handle and lift straight
up and out of the Glass Bowl. It may be necessary to pull up on
the Handle to release it from the grooves on the top of the
Control Panel/Heater Assembly.
10
Operating Instructions (Continued)
FIGURE 5