


7
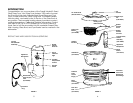
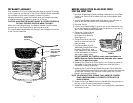
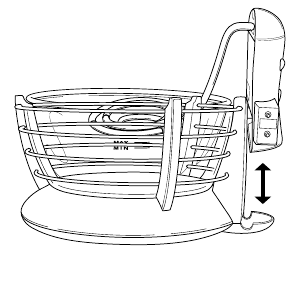
FRY BASKET ASSEMBLY
Fully extended, the Fryer Basket Handle hinge and post fits snugly
in the 2 grooves on the top of the Control Panel/Heater Assembly.
You will hear a click when properly locked into place.
Wearing oven mitts, grasp the Handle and pull straight upwards
to raise and lower the Basket in and out of the oil.
CAUTION: MAKE SURE FRY BASKET HANDLE IS LOCKED PROPERLY IN
THE FULLY EXTENDED POSITION WHEN COOKING.
When you are finished frying, the Basket Handle Hook fits easily
over the rim of the Glass Bowl to allow food to drain.
The Fryer Basket Handle folds for storage. See Storage Instructions
in this Owner’s Manual.
BEFORE USING YOUR GLASS DEEP FRYER
FOR THE FIRST TIME
1. Remove all packaging and packing materials from the Glass
Deep Fryer. Remove any labels from the outer stainless steel
surfaces.
2. Unfold Fryer Basket Handle and snap down. You will hear a
click as the Handle locks into its extended position.
3. Remove the Lid.
4. Lift the Fryer Basket straight up and out of the Glass Bowl. Pull
up on the Handle to release it from the grooves on the top of
the Control Panel/Heater Assembly.
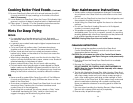
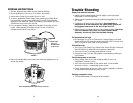
5. Grasp the Control Panel/
Heater Assembly firmly
and slide up to remove.
(See Figure 4.)
6. Grasp Glass Bowl with both
hands to remove from the
Main Housing.
7. The Removable Lid with
Washable Grease Filter, Main
Housing, Glass Bowl, and
Fryer Basket can be washed
in the dishwasher or by hand
with warm soapy water.
DO NOT IMMERSE THE CONTROL PANEL/HEATER ASSEMBLY IN
WATER. Wipe the Control Panel/Heater Assembly with a damp
cloth. Dry all parts thoroughly.
8. Replace the Glass Bowl until it rests on the 3 stops located on
the inside of the Main Housing. Make sure that the Bowl is
centered correctly and level.
9. Replace the Control Panel/Heater Assembly. Firmly slide the
Control Panel downward into the location grooves on the back
of the Main Housing. You will hear a click when the Control
Panel is in its proper position.
NOTE: THE APPLIANCE WILL OPERATE ONLY WHEN THE CONTROL
PANEL/HEATER ASSEMBLY IS CORRECTLY FITTED INTO THE
MAIN HOUSING.
10. Replace the Fryer Basket and lock Handle into the grooves on
the top of the Control Panel/Heater Assembly.
11. Replace the Lid. Your Glass Fryer is now completely assembled
and ready for use.
8
FIGURE 3
FIGURE 4
Fryer Basket
Handle hinge
and post
Basket Handle
Hook sits inside
Glass Bowl
Basket Handle
grooves