


STORING INSTRUCTIONS
1. Be sure all parts are clean and dry before storing.
2. Store appliance in its box or in a clean, dry place.
3. Never store Deep Fryer while it is hot or wet.
4. To store, assemble clean Deep Fryer, placing the Glass Bowl
into the Main Housing and sliding the Control Panel/Heater
Assembly into position. Place the Folding Fryer Basket into the
Glass Bowl and cover with the Lid.
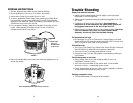
5. For compact storage, grasp the Handle in the palm of your
hand, while pressing the black hinge. Lift up to fold the
Handle inward and over the Lid.
6. Remove detachable cord and store with the appliance in a
clean dry place.
15
Trouble Shooting
Deep Fryer does not operate
• Make sure the detachable power supply cord is properly
attached to the Receptacle.
• Make sure the polarized plug is properly plugged into a 120V
AC outlet.
• Check the oil level in the Glass Bowl. Any time there is
insufficient oil in the Glass Bowl, the Safety RESET feature will
be triggered and power to the unit will be shut OFF.
• Make sure the Control Panel is in its proper position. The Deep
Fryer will operate ONLY when the Control Panel/Heater
Assembly is correctly fitted into the Main Housing.
Oil temperature too high
• Not enough oil; no oil in Glass Bowl. Unplug Deep Fryer and
check oil level. Oil level should be between MIN (6 cups) and
MAX (8 cups) fill lines. Add oil as necessary.
Oil bubbles over
• Too much oil in Deep Fryer Glass Bowl. Never fill with oil above
the MAX fill line (2 quart/8 cup maximum capacity).
• Too much food. Fry smaller quantities at a time.
• Food is too wet. Pat dry with paper towels before placing in
Fryer Basket.
Food tastes greasy or not crisp
• Using wrong type of oil. Use a high-quality oil such as
vegetable, canola or corn.
• Too much food cooked at the same time. Cook smaller
amounts of food — especially frozen foods.
• Frying temperature is too low. Allow unit to preheat or reheat
to the desired temperature prior to use.
Emitting unpleasant odors
• Oil has deteriorated. Change oil as needed.
16
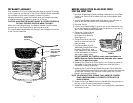
Press hinge
with your
thumb and lift
up and over
FIGURE 6
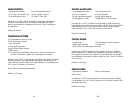
FIGURE 7
Store with Handle folded over the top of the Lid.