


14
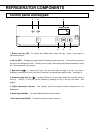
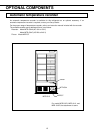
OPTIONAL COMPONENTS
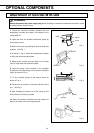
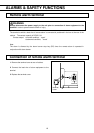
Attachment of recorder MTR-G04
WARNING
Always disconnect the power supply plug before installing an automatic temperature recorder in order
to prevent electric shock or injury.
1. Follow the instruction manual provided with the
temperature recorder and attach the recorder to the
fixture MPR-S7.
2. Open the cover for recorder attachment space by
removing the screw.
3. Remove the cover by pushing the shaft on both side
outward. See Fig. 1.
4. As shown in Fig. 2, attach the temperature recorder
to the fixture with enclosed screws.
5. Remove two screws fixing the plate for air intake
vent (far right side) and remove the plate.
6. Lead the sensor of the recorder in the chamber
through the hole after taking out the thermal insulation
from it as shown in Fig. 3.
7. Fix the recorder sensor to the sensor fixture as
shown in Fig. 4.
8. Connect the connector on recorder with that on the
unit. See Fig. 5
9. After installing the bottom cut of the fixture on the
shaft, secure the fixture by screws.
10. Return the thermal insulation and then attach the
plate for air intake vent to the original place.
Fig. 1
Fig. 2
Fig. 3
Fig. 4
Fig. 5
screw
cover
shaft
MPR-S7
MTR-G04
sensor
fixture
connector