


14
Operating Your Oven
Convection Roast
Your oven’s Convection roast mode uses a combination of
the convection fan and heat sources above and below the
food. It is best for rib roasts, turkeys, chickens, etc.
Roasting Tips
All baking modes can be used to roast in your oven.
However, the Convection roast mode is recommended to
produce meats that are deliciously seared on the outside
and succulently juicy on the inside in record time. Foods
that are exceptional, when prepared in the Convection
Roast mode, include: beef, pork, ham, lamb, turkey,
chicken and cornish hens.
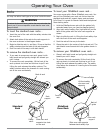
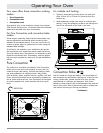
Always roast meats fat side up in a shallow pan, using a
roasting rack. Always use a pan that ts the size of the
food being prepared. The broiler pan and grill, accompa-
nying the oven, can be used in most cases. No basting is
required when the fat side is up. Do not add water to the
pan. It will cause a steamed effect. Roasting is a dry heat
process.
Poultry should be placed breast side up on a rack in a
shallow pan that ts the size of the food. Again, the
broiler pan and grill accompanying the oven can be used.
Brush poultry with melted butter, margarine or oil before
and during roasting.
When using the roast mode, do not use pans with tall
sides. They interfere with the circulation of heated air over
the food.
If using a meat thermometer, insert the probe halfway
into the center of the thickest portion of the meat. For
poultry, insert the thermometer probe between the body
and leg into the thickest part of the inner thigh. To ensure
an accurate reading, the tip of the probe should not touch
bone, fat, or gristle. Check the meat temperature 2/3 of
the way through the recommended roasting time. After
reading the meat thermometer once, insert it ½ inch
further into the meat, then take a second reading. If the
second temperature registers below the rst, continue
cooking the meat.
Remove meats from the oven when the thermometer reg-
isters 5 to 10°F below the desired temperature. The meat
will continue to carry-over.
Allow roasts to stand 15 to 20 minutes after roasting in
order to make carving easier.
Roasting times always vary according to the size, shape
and quality of meats and poultry. Less tender cuts of meat
are best prepared in Bake mode and may require moist
cooking techniques. Use your favorite cookbook recipes.
Reduce spatter by lining the bottom of the roasting pan
with lightly crushed aluminum foil.
Your oven offers two broil modes...
Broil•
Convection broil•
warning
To avoid damage to the meat probe, remove it from the •
oven when using either of the broil modes. If the meat probe
is connected the broil modes will not start. The meat probe
symbol will flash when you attempt to start the oven in one
of the broil modes with the meat probe connected.
Use the Broil and Convection Broil modes only with the oven •
door completely closed.
Broiling is a quick and avorful way to prepare many
foods, including steaks, chicken, chops, hamburgers and
sh.
Broil
Uses a top heat source. It is best for broiling smaller
amounts of food.
Convection Broil
This mode uses a combination of the convection fan and
a top heat source. It is best for items that do not need to
be ipped such as, thinner cuts of meat, sh and garlic
bread.
Broiling Tips
It is normal and necessary for some smoke to be •
present to give the food a broiled avor.
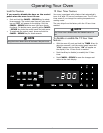
Setting the timer is recommended to time the broiling •
process.
Always use a broiler pan and grill to provide drainage •
for excess fat and grease. Doing so will reduce spat-
ter, smoke and are-ups.
Start with a room temperature broiler pan for even •
cooking.
Use tongs or a spatula to turn and remove meats. •
Never pierce meat with a fork because the natural
juices will escape.
Broil food on the rst side for a little more than half of •
the recommended time, then season and turn. Season
the second side just before removing the food from
the oven.
To prevent sticking, lightly grease the broiler grill. •
Excess grease will result in heavy smoke. For easier
cleaning, remove the broiler pan and grill when
removing the food.
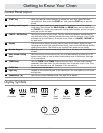
Understanding the Various Oven Modes (Continued)
1 2
1 2
1 2
1 2
1 2