


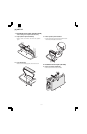


D. Installing onto Windows NT 4.0
1) Turn the computer on and start Windows NT.
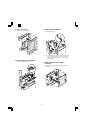
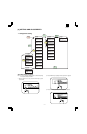
2) Click the Start menu, point to “Settings”, and choose “Printers”.
3) When the “Printers” window appears, double-click the “Add
Printer” icon.
4) Choose “My Computer” or “Network printer server” and click the
[Next] button.
• The following steps use “My Computer” as an example.
For more information about using this printer as a network
printer, refer to the Windows NT 4.0 networking documentation.
5) Check the checkbox for the port you are using and click the [Next]
button.
6) Click the [Have Disk...] button.
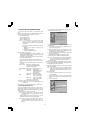
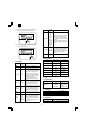
7) Insert the SHARP Software CD-ROM into the CD-ROM drive, type
R:\English\WinNT and click the [OK] button.
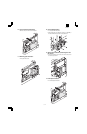
8) Choose the appropriate printer driver from those listed below and
click the [Next] button.
• PCL6 Printer Driver:SHARP AR-160/200 Series PCL6
• PCL5e Printer Driver:SHARP AR-160/200 Series PCL5e
Note: It is recommended that you install the PCL6 printer driver.
If you have a problem printing from older software using
the PCL6 driver,remove it and install the PCL5e driver.
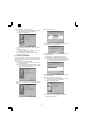
9) Set the printer name.
<1> If you want to change the printer name, enter a new name in
the space provided.
<2> If the program displays, “Do you want your Windows-based
programs to use this printer as the default printer?”, check
“Yes”.
<3> Click the [Next] button.
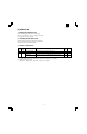
10)Make the appropriate settings for your environment.
• When using print sharing, choose “Shared” and enter a share
name. If necessary for your environment, select Windows 95
from the list of operating systems.
• If you are not using shared printing, choose “Not shared”.
After making the settings on this screen, click the [Next] button.
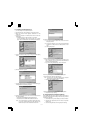
11)Print a test page by clicking the [Finish] button.
Note: If you check “No” and click the [Finish] button, the printer
does not print a test page after the installation.
• The printer driver installation begins.
12)When the test page is printed properly, click the [Yes] button.
• The printer is ready for printing.
E. Changing Printer Configuration Settings
After installing the printer driver use the procedure in this section to
change the printer configuration settings. Also refer to the print driver
help for more information.
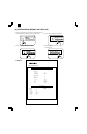
1. Click the Start menu, point to “Settings”, and choose “Printers”.
2. Right-click the appropriate printer and choose “Properties”
fromthe menu.
3. Click the Configuration tab and change the printer settings.
AR-PB8
3 – 7