


14
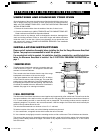
Two optional accessories are available for this oven.
1. Charcoal Filter (RK-260). This is required when hood exhaust is recirculated. See Charcoal Filter on page 31.
If dealer does not stock this item, it can be ordered by calling 1-800-642-2122.
2. Filler Panel Kit. For use when the oven is installed in a 36-inch or 42-inch wide opening. The metal filler panels
come in 3-inch wide pairs. One set is needed for a 36-inch opening and 2 sets for a 42-inch opening. White,
black, stainless and bisque are available.
To purchase contact: Imperial Cal Products, Inc.
1141 S. Acacia Ave.
Fullerton, CA 92831
Phone: (714) 446-7440 Fax: (714) 446-7444
OPTIONAL ACCESSORIES
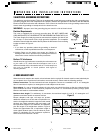
UNPACKING AND INSTALLATION INSTRUCTIONS
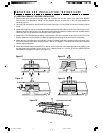
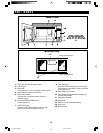
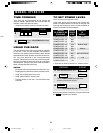
Two people are recommended to attach the Microwave Oven/Hood to the Mounting Plate.
1. Thread the Power Supply Cord through the hole made in the bottom of the top cabinet. Install the oven by
snapping it onto the Mounting Plate. See Figure 23.
2. Use two Tapping Screws 5 to secure the levers that are on the bottom of the oven. See Figure 24.
3. Use two Top Cabinet Screws 3 and two Flat Washers 6, supplied in the INSTALLATION HARDWARE, to
attach the unit to the top cabinet. See Figure 25.
4. Make a bundle of the Power Supply Cord and attach it to the inside of the cabinet using the Power Cord Hanger
4. See Figure 25.
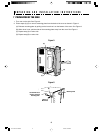
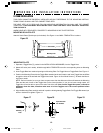
5. Attach the bottom sash # to the oven by sliding the two tabs into the rectangular openings located on the bottom
front of the oven. See figure 26 (A).
6. Use 5 Tapping Screws 4 x 12 mm 5 from the INSTALLATION HARDWARE and tighten into place. See Figure
26 (B).
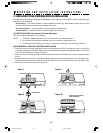
MOUNTING OVEN TO THE WALL
CHECKLIST FOR INSTALLATION
1. Make sure the unit has been installed according to
all of the Installation Instructions and the Wall and
Top Cabinet Templates.
2. Plug in the power cord.
3. Keep the Operation Manual.
Figure 23 Figure 24
Figure 25
3
4
6
5
5
Figure 26
(B)
(B)
(B)
(B)
(B)
(A)
(A)
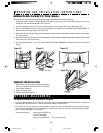
Install grease filters.
R-2110J manual#372 5/10/04, 2:44 PM14