


INSTALLATION INSTRUCTIONS
1. Make sure that all the packing materials are removed from the inside of the door.
2. WARNING: Check the oven for any damage, such as misaligned or bent door, damaged door
seals and sealing surface, broken or loose door hinges and latches and dents inside the cavity
or on the door, broken wave guide. Do not remove the wave guide cover. If there is any
damage, do not operate the oven and contact SERVICE CENTRE APPROVED BY SHARP.
3. Place the turntable roller in the coupling on the oven floor, then place the turntable on the roller
stay, ensuring it is located firmly. Refer to OVEN DIAGRAM below. NEVER operate the oven
without the roller stay and turntable.
4. This microwave oven must be placed on a flat, stable surface to hold its weight and the
heaviest food likely to be cooked in the oven.
5. Neither the manufacturer nor the distributors can accept any liability for damage to the
machine or personal injury for failure to observe the correct electrical connecting procedure.
The A.C voltage must be single phase 230-240V, 50Hz.
6. Do not place the oven where heat, moisture, or high humidity are generated, or near
combustible materials.
7. For correct operation, the oven must have sufficient airflow. Allow 20cm of space above the
oven, 10cm at back and 5cm at both sides. Do not cover or block any openings on the
appliance. Do not remove feet.
8. This appliance must be earthed.
9. Make sure that the power supply cord is undamaged and does not run under the oven or over
any hot or sharp surface.
10. The socket must be readily accessible so that it can be easily unplugged in an emergency.
11. Do not use the oven outdoors. Operate the oven from a general purpose domestic outlet. If a
generator is used, do not operate the oven with non-sinusoidal outputs.
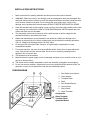
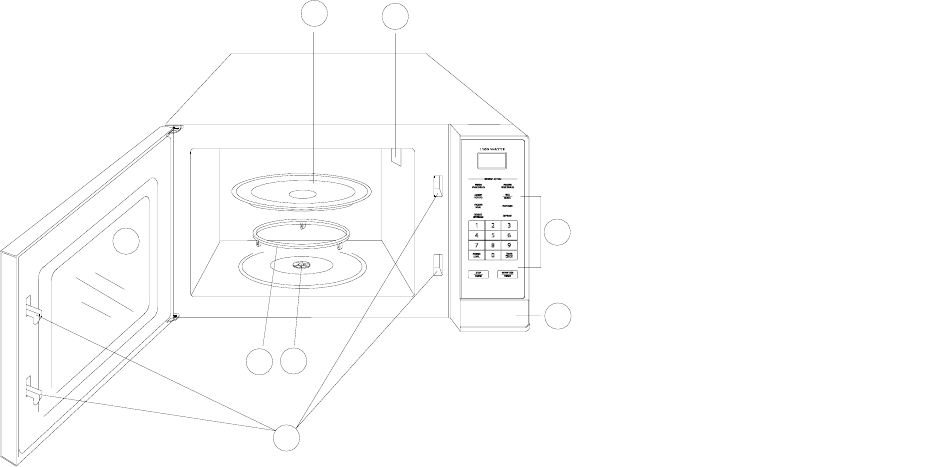
OVEN DIAGRAM
1. Door Safety Lock System.
2. Oven Window.
3. Turntable Roller.
4. Shaft
5. Door Release Button.
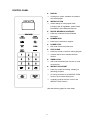
6. Control Panel.
7. Wave Guide.
8. Glass Turntable.
Accessories:
Glass Turntable
Turntable Roller
Operation Manual
5
6
8
7
3
4
2
1
4