


O
PERATION
U
LTIMATE
R
ESTAURANT
R
ANGES
P
AGE
10
OF
48 O
WNER
’
S
M
ANUAL
1190820
REV
3
(11/10)
5. Set the griddle thermostat dials to maximum, one at a time, and observe the griddle burners through holes in
control panel. When operating, the burners should have a 1/4" to 5/8" (13 to 16 mm) high steady blue flame.
After operating the griddle for ten minutes with the thermostat dial set at maximum, turn the dial to “LOW” and
again observe the burners through the holes in the control panel. When the thermostat knob is set “LOW” the
burners should have a 1/8" to 1/4" (3 to 6 mm) high steady blue flame. Adjust if necessary.
R
AISED
-G
RIDDLE
B
ROILER
Ranges can be ordered with a raised-griddle broiler that has three separately controlled burners.
At the end of each use, allow griddle to cool normally. After griddle has cooled, coat griddle surface with a light film of
cooking oil to protect surface from moisture.
To light the pilots of a raised-griddle broiler, do the following:
1. Remove griddle from unit.
2. Position ceramics on burners with projections pointing downward.
3. Light pilot tube ports (2 at each burner). Adjust pilot flame to be large enough to effect ignition.
4. Place griddle in position on range.
5. Turn control knobs completely on.
6. Burner should have 1/2" to 5/8" steady blue flame. Adjust if necessary.
H
OT
T
OP
S
ECTIONS
The range can be ordered with a hot-top section replacing one or more open-top burner sections. Each hot-top is
controlled by a knob on the front control panel.
To light the pilots of a hot-top section, do the following:
1. Raise or remove hot-top plate. Every two burners have one pilot located at the front and in between burners.
2. Light the pilot.
3. Pilot flame should be steady blue, large enough to effect ignition.
4. Turn burner control knob completely on. The sharp blue flame should be approximately 1/4" to 3/8" high.
5. Replace hot top plate.
6. Adjust the burner control knob to the desired setting.
C
HARBROILER
S
ECTIONS
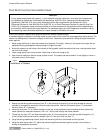
Burners have individual control knobs, which can be turned to OFF, HIGH, or LOW. Each burner top-grate can be
turned over to provide either wide branding marks or narrower branding marks with channels to carry away drippings
(and so reduce flare up). The back-to-front slope of each top-grate is adjusted by positioning the back end of the top-
grate on either the lower or the higher grate-support rail. The radiants (just above the burners) can be reversed front-
and-back to provide higher heat toward the back than the front, or vice versa.
To start cooking, turn the appropriate control knob to HIGH. Visually check that the burner ignites. The gas does NOT
automatically shut off if the burner does not ignite! If the burner does not ignite, check and/or light the pilots (see
procedure below). When the burner is hot, the burner flame should appear blue and steady (some slight yellowing of
the flame tips may occur when using propane gas). When done cooking, turn the appropriate control knob to OFF.
(The pilot should remain lit).
A pilot is located near the front of each burner. To light the pilots, do the following:
1. Check that the burner control knob is in the OFF position.
2. Lift up a grate in order to expose the two pilots. They are accessible through a slot near the front end of the
radiant plate.
3. Check that each pilot is in the correct position.
4. Turn on the gas supply to the restaurant range (if not already on).
5. Light the pilots with a match or a pilot-lighting device. The pilot flames should be blue and steady.