


U
LTIMATE
R
ESTAURANT
R
ANGES
O
PERATION
O
WNER
’
S
M
ANUAL
1190820
REV
3
(11/10) P
AGE
9
OF
48
4. Open the kick panel below the oven door, turn the knob on the safety valve to the PILOT position, and depress
the button on oven safety valve.
5. Light the pilot while continuing to depress the button on the safety valve. Wait 30 seconds, then release the
button. The pilot should remain lit.
6. Turn the knob on the safety valve to the ON position.
7. Close the kick panel.
8. Replace the fire plate and oven bottom.
O
PERATION OF
E
LECTRIC
O
VEN
To operate an electric oven, do the following:
1. Turn the oven switch on the front panel to ON.
2. Turn the thermostat knob on the front panel to the desired temperature.
For electric convection ovens, the fan will run continuously when the oven switch is ON and the oven door is closed.
O
PERATION OF
I
NFRARED
B
ROILER
I
NSIDE
O
VEN
To operate the optional infrared broiler inside of a gas oven, do the following:
1. Turn the oven thermostat OFF.
2. Turn on the oven broiler switch on the front panel to ON.
3. If the broiler fails to light, turn the oven-broiler switch to OFF, open oven door, wait 5 minutes, close oven door,
and turn the oven-broiler switch to ON. (The infrared broiler has electronic ignition, so there is no pilot to light.)
Note that the broiler temporarily turns off while the oven door is open.
O
PERATION OF
N
ON
-T
HERMOSTATIC
G
RIDDLES
Ranges can be ordered with a non-thermostatic griddle that is controlled by knobs on the front control panel.
At the end of each use, allow griddle to cool normally. After griddle has cooled, coat griddle surface with a light film of
cooking oil to protect surface from moisture.
If a non-thermostatic griddle pilot needs to be lit, do the following:
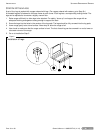
1. Raise griddle at front so it is approximately 8" (200 mm) high and prop it up with two blocks of wood. On some
models, the pilots can instead be lit by inserting a long match or lighter through a hole on the front control panel.
2. Ignite pilot tube located under all burners with port at each side of burners. Pilots are supplied and adjusted by a
common valve located below the filter on the manifold.
3. Carefully lower the griddle into position, use the griddle control knob to turn on the griddle, and observe the
griddle burners through holes in control panel. When operating, the burners should have a 1/4" to 5/8" (13 to 16
mm) high steady blue flame. Adjust if necessary.
O
PERATION OF
T
HERMOSTATIC
G
RIDDLES
Ranges can be ordered with a thermostatic griddles that is controlled by a knob on the front control panel.
At the end of each use, allow griddle to cool normally. After griddle has cooled, coat griddle surface with a light film of
cooking oil to protect surface from moisture.
If a thermostatic griddle pilot needs to be lit, do the following:
1. Raise griddle at front so it is approximately 8" (200 mm) high and prop it up with two blocks of wood. On some
models, the pilots can instead be lit by inserting a long match or lighter through a hole on the front control panel.
2. The thermostat sensing bulbs must be fully inserted into their tubular holders, which are welded to the underside
of the griddle.
3. One pilot tube is located under all burners with ports at each side of the burners. Pilots are supplied and adjusted
by a common valve on the manifold. Light the pilots.
4. Carefully lower the griddle into position taking extreme care that capillary tubes are coiled under manifold in
control panel compartment. NEVER leave any part of the capillary tube in the burner compartment.