


S
ERVICE
U
LTIMATE
R
ESTAURANT
R
ANGES
P
AGE
28
OF
48 O
WNER
’
S
M
ANUAL
1190820
REV
3
(11/10)
C
ALIBRATION OF
G
AS
O
VEN
T
HERMOSTAT
The oven thermostat control is carefully calibrated at the factory so that its dial settings closely match actual oven
temperatures. Field recalibration is seldom necessary, and should not be resorted to unless considerable experience
with unexpected cooking results definitely proves that the control is not maintaining the temperatures to which the dial
is set.
When checking the oven temperature, use a test instrument or a reliable mercury thermometer positioned in the
center of the oven. The oven bottom must be in place. For convection ovens, the blower baffle must be in place.
Proceed as follows:
1. Light the oven pilot, set the oven thermostat to 350°F, and, if the oven is a convection oven, turn on the fan.
2. After burner has been on about 15 minutes, check the oven temperature. The oven door should be open for as
short a time as possible. Use a flashlight, if necessary, to see the thermometer clearly.
3. Continue to check temperature noting the minimum and maximum "swing" variation in temperature until two
successive readings are within 5 degrees of each other. The oven temperature is the midpoint of the "swing"
range.
The control should be recalibrated if your reading is not within 20 degrees of the dial setting (350°F). If calibration is
required, the additional steps to be taken are these:
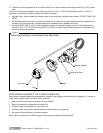
4. Insert a flat screwdriver through the center of the thermostat stem and then turn the adjustment screw clockwise
to decrease the oven temperature and counterclockwise to increase the oven temperature. Do not allow the stem
to turn. Turn the adjustment screw only 5 degrees of rotation in the appropriate direction, then repeat Steps 2
and 3 to check the temperature. Repeat until the temperature is within 10 degrees of 350°F.
5. Set the oven thermostat to 400°F. Check oven temperature again, as instructed in Steps 2 and 3. If the oven
temperature is not within 20 degrees of the dial setting (400°F) it means that the sensing element is inoperative
and the control should be replaced.
A
DJUSTMENT OF
T
HERMOSTATIC
G
RIDDLE
B
YPASS
F
LAME
L
EVEL
When the griddle reaches the temperature at which the dial is set, the control cuts down the flow of gas to the amount
required to keep the griddle at that temperature. Always, however, the control must bypass enough gas to keep the
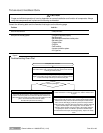
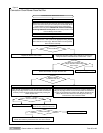
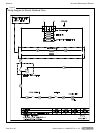
entire burner lit. To maintain this minimum flame, the bypass must be set carefully and accurately, as follows (see
Figure 12 on page 29):
1. Light the burner, then turn dial FULL ON.
2. After 5 minutes, turn dial clockwise to point slightly beyond first mark on dial.
3. Remove dial and bezel.
4. With a screwdriver, turn Bypass Adjustor (counterclockwise to increase the flame, clockwise to decrease it) until
there is a minimum flame over the entire burner.
5. Replace bezel and dial, turning the dial clockwise until it locks in the OFF position.
C
ALIBRATION OF
T
HERMOSTATIC
G
RIDDLE
T
HERMOSTAT
The griddle temperature control is carefully calibrated at the factory—that is, it is so adjusted that dial settings match
actual temperatures. Field recalibration is seldom necessary, and should not be resorted to unless considerable
experience with cooking results definitely proves that the control is not maintaining the temperatures to which the dial
is set.
Recalibration should not be undertaken, however, until the griddle bypass flame has been adjusted (see previous
subsection).
To check temperatures when recalibrating, use a test instrument with a DISC type thermocouple for surface
temperature checking. Drop a couple of drops of oil on griddle surface plate and place thermocouple disc flat into the
oil.
Proceed as follows (see Figure 12 below):
1. Remove dial and push out metal insert.
2. Replace dial, turn to 350°F (175°C) mark, and light burner.
3. After burner has been on about 15 minutes check temperature.