


PLATINUM SERIES SECTIONAL RANGE INSTALLATION
INSTALL AND OPERATIONS MANUAL 1185836 REV 3 (07/06) PAGE 31 OF 80
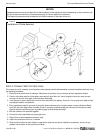
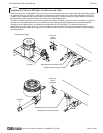
3. The gas connection piping may have been partially installed at the factory. If necessary, attach the gas
connection of any appliances mounted on a flue riser.
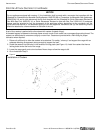
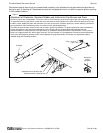
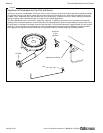
4. Locate the pressure regulator(s) packed with the sectional range. Install the pressure regulator, taking care that
the direction of gas flow corresponds to the arrow on the side of the pressure regulator.
CAUTION
HOLD THE PRESSURE REGULATOR WITH A WRENCH WHEN TIGHTENING THE CONNECTION TO THE
SUPPLY PIPE TO AVOID DAMAGE TO THE REGULATOR, VALVE, AND OTHER COMPONENTS.
5. Install a service shut-off valve to the pressure regulator, and connect the gas supply line to the shut-off valve.
6. If applicable, install the vent line of the pressure regulator to the outdoors.
7. Turn on the gas and immediately check for leaks using soapy water.
8. If the optional sloped enclosure for a flue-mounted model was ordered, install it at this time.
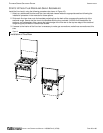
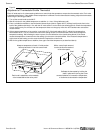
STEP 8: CONNECT WATER SUPPLY
If a rail-mounted fill-hose was ordered (as a special option), there will be a corresponding water connection on the
back of the section. Connect the water supply.
STEP 9: CHECK THE INSTALLATION
Check the installation, as follows:
1. Check that all screws and bolts are tightened.
2. Check electrical connection(s).
3. Check that the gas connection has been made correctly.
4. Check water connection(s).
5. Move the battery into the final position at which it will be operated.
6. Check that the battery is level. If not, adjust the legs or casters.
7. Check that the appropriate minimum clearances are satisfied (see page 4).
8. Check that there is sufficient clearance to open all doors and pull-out all grease trays and crumb trays.
9. Check that adequate ventilation (fresh air supply and hood exhaust) is available to the room in which the
appliance will operate.
10. Wipe clean all cooking surfaces (especially griddles).
11. Check that nothing is obstructing the air intake openings and/or the combustion-exhaust openings.
STEP 10: CHECK OPERATION OF EACH SECTION
Check the operation of each section, as follows:
1. Turn electricity supply on.
2. Turn gas supply on. Immediately check all gas connections for leaks using soapy water.
3. Turn water supply on (if applicable). Check for water leaks.
4. Light all pilots (see the appropriate Operation section elsewhere in this manual). Start with the section(s) furthest
from the gas supply connection(s) to purge air from the gas lines. Check all pilots for correct flame height.
5. Turn on the burners of each section using only the lowest temperature settings (for now). Check all burners for
correct flame appearance and height.
6. Begin to break-in all griddle surfaces by turning on all griddle burners to LOW for at least one hour. (In case any
problems occur, do not leave the battery unattended during this time!) This will temper the griddle surface and
avoid possible damage.
7. Check operation of all sections (except griddles) for the full-range of operating settings, including checking all
burners for correct flame appearance and height at the HIGH settings.
8. Complete the break-in of all griddle surfaces (after they have been operating at LOW for at least one hour) by
gradually bringing each griddle up to frying temperature. Then spread over each griddle three or four ounces of